Textadept 13.0 Manual
Contents
- Introduction
- Getting Started
- User Interface
- Working with Files and Projects
- Adept Editing
- Compile, Run, Build, and Test
- Modules
- Themes
- Scripting
- Compiling
- Appendix
Introduction
Overview
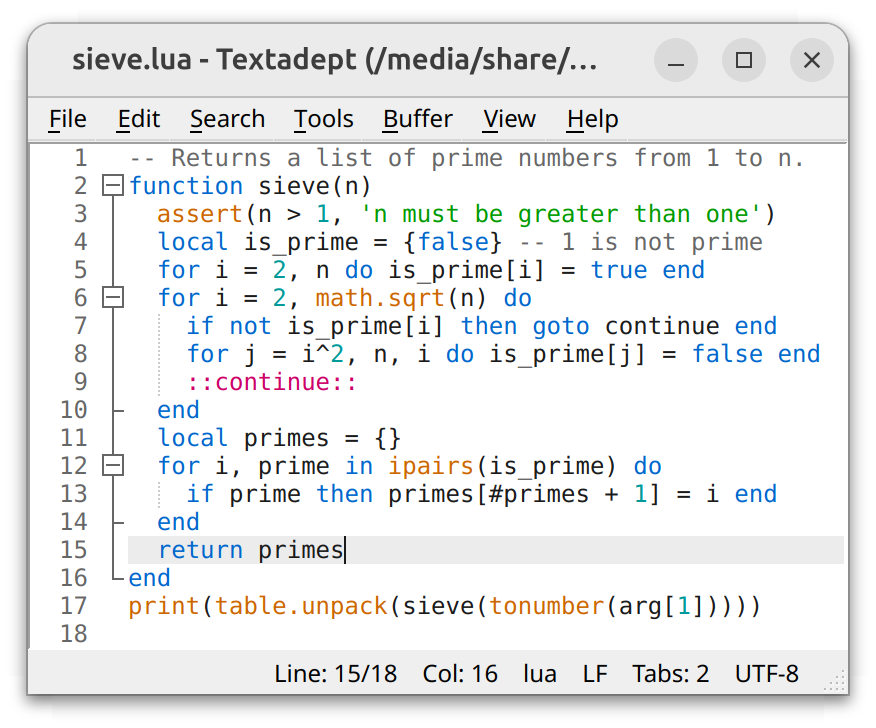
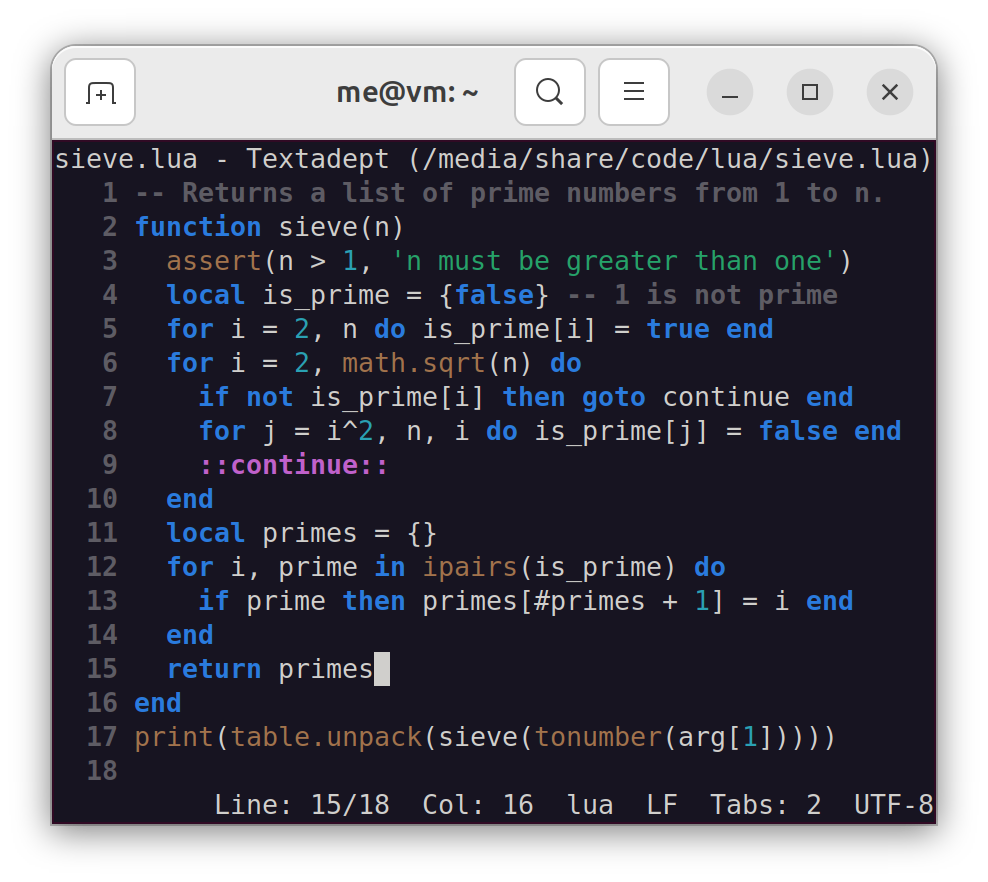
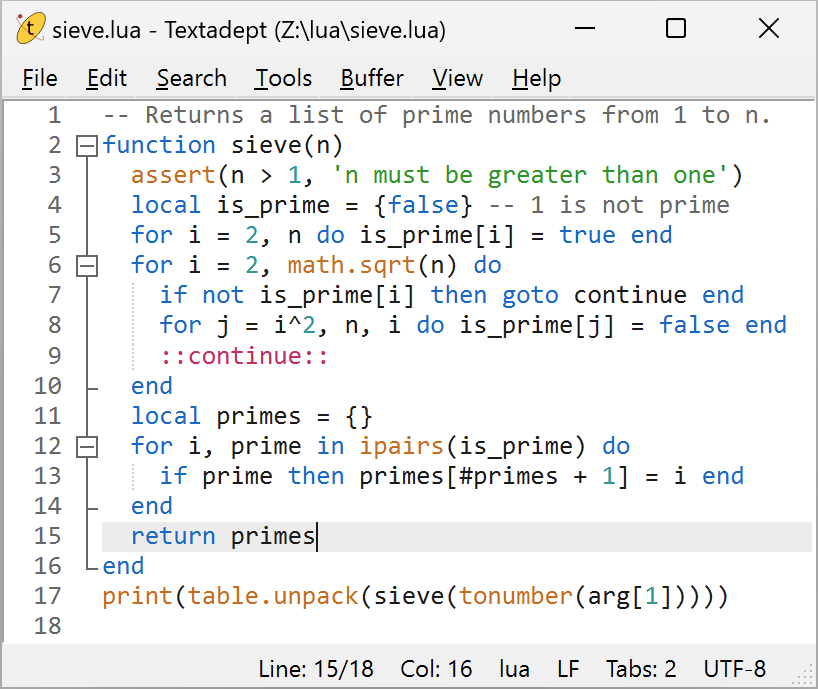
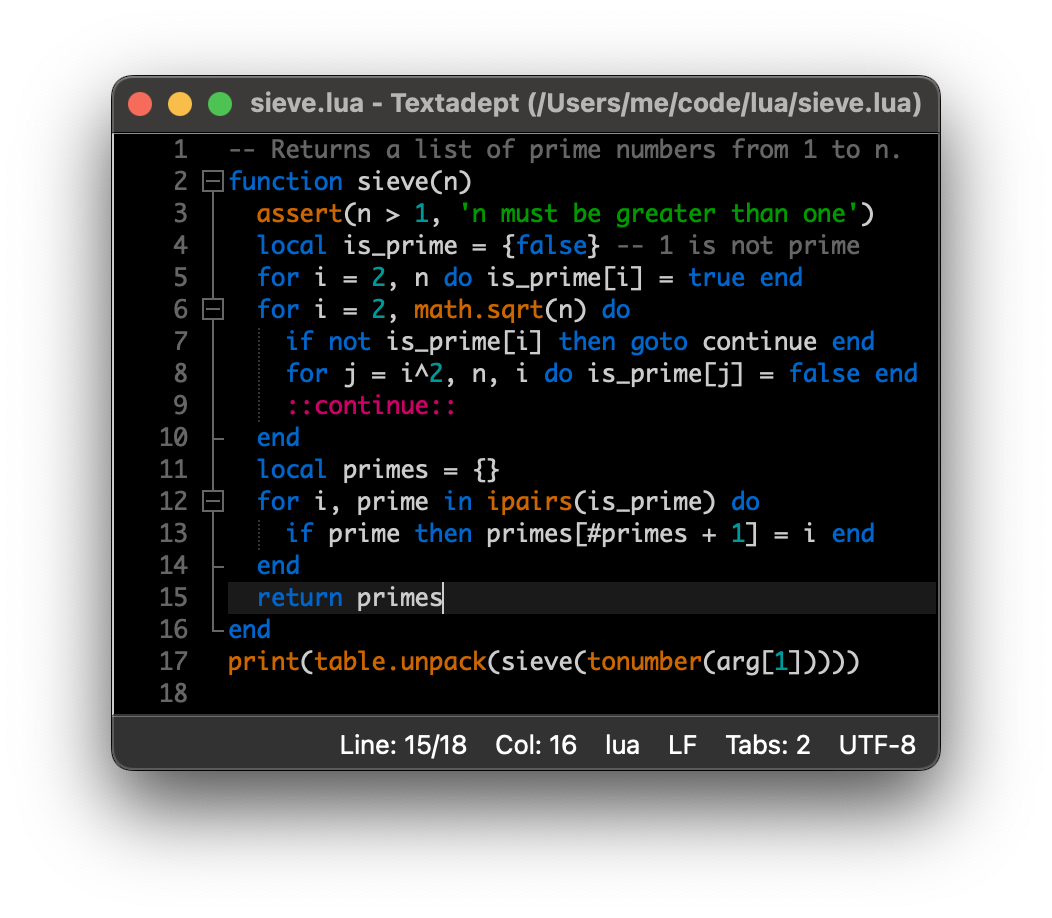
Textadept is a fast, minimalist, and remarkably extensible cross-platform text editor for programmers. It is a traditional desktop application and has both a graphical user interface (GUI), and a terminal user interface (TUI). Written in a combination of C, C++, and Lua, the editor is extremely light on resources and very responsive.
About This Manual
This manual uses the following typographical conventions:
- Italic: Used for filenames.
Constant width: Used for environment variables, command line arguments, shell code, key bindings, and Lua code, including functions, tables, and variables.
Key bindings use the following modifier key representations:
| Modifier | Windows, Linux, and BSD | macOS | Terminal |
|---|---|---|---|
| Control | Ctrl |
^ |
^ |
| Alt | Alt |
⌥ |
M- |
| Command | N/A | ⌘ |
N/A |
| Shift | Shift |
⇧ |
S- |
This manual uses the following terminology:
- buffer: An object that contains editable text. Some other applications call this object a document or file.
- view: An object that displays a single buffer. Some other applications call this object a window.
- caret: The visual that represents the text insertion point. It is usually a blinking line. Some other applications call this object a cursor.
- module: A package of Lua code that provides functionality for Textadept.
- lexer: A Lua module that highlights the syntax of source code written in a particular programming language. Textadept refers to a programming language by its lexer’s name.
-
~/.textadept/: Platform-specific directory where Textadept stores all settings and user data.
Platform Directory Windows C:\Users\username\.textadept\ macOS /Users/username/.textadept/ Linux /home/username/.textadept/ BSD /home/username/.textadept/ (Substitute username for your actual user name.)
Finally, this manual assumes you are familiar enough with the Lua programming language that you can understand the simple code samples spread throughout the manual’s contents. If you would like to quickly get up to speed, or need a refresher, the Lua Quick Reference may be of help.
Getting Started
Requirements
Textadept’s pre-built binaries require the following:
- Windows 10+ (64-bit or ARM)
- macOS 13+
- Linux: Qt 5 or GTK 3 for the GUI version, and ncurses for the terminal version.
You can compile Textadept from source for use with different UI library versions, such as Qt 6 and GTK 2.24.
Download
Textadept releases and their release notes can be found here. Select the appropriate binary package for your platform. You can optionally download a companion set of modules that provide extra features and functionality for the core application.
Windows Note: antivirus software may flag the Windows package as containing a virus or malware. This is a false-positive, caused by Textadept’s terminal version executable, which is a console application.
BSD Note: binary packages for BSD are not available. You will have to compile Textadept manually. Installing and running Textadept will be similar to the Linux instructions below.
Installation
Installing Textadept is simple and easy – no administrator privileges necessary. On Windows and
Linux, simply unpack the archive anywhere. On macOS, unpack the archive and move Textadept.app
to your user or system Applications/ folder like any other macOS application. The macOS
archive also contains a ta script for launching Textadept from the command line. You can put
this script somewhere in your $PATH (e.g. /usr/local/bin/), but this is optional.
If you downloaded Textadept’s extra set of modules, unpack it into ~/.textadept/ (keeping the top-level modules/ directory intact). If ~/.textadept/ does not exist, either create it manually, or run Textadept, which creates it for you. You could instead unpack the extra modules into Textadept’s directory (thus merging the two modules/ directories), but this is not recommended, as it may make upgrading more difficult
Note: Textadept generally does not auto-load modules, so you will need to load any extra modules you installed manually. The modules section describes this process.
Updating
Textadept does not have an auto-update process, as it does not connect to the internet (it is just a text editor). Instead, download new versions as they release (typically the first day of the month every month or two), and unpack or copy its contents into your current installation, overwriting it.
Running
Run Textadept on Windows by double-clicking textadept.exe or textadept-curses.exe. On macOS, double-click Textadept.app or invoke the ta script from the command line. On Linux, invoke textadept, textadept-gtk, or textadept-curses from a file browser, run dialog, terminal, etc.
Linux Note: it is not possible to provide a single Textadept binary that runs correctly on all systems. If the editor will not start on your machine, you must compile it manually.
macOS Note: if you get a notice that Textadept “is damaged and can’t be opened,” you will
need to remove the quarantine attribute from the app by running the following command in your
terminal: xattr -d com.apple.quarantine /path/to/Textadept.app. Recent versions of macOS have
been getting more and more strict about what apps it considers to be “safe”.
For better platform integration:
- Windows: create shortcuts to the executables on the Windows Desktop, Start Menu, Quick Launch toolbar, etc.
- macOS: pin the app to your dock.
-
Linux: use Textadept’s src/textadept.desktop, src/textadept-gtk.desktop, and src/textadept-curses.desktop files by picking one of the following:
- Create a symbolic link to the executables from somewhere in your
$PATH(e.g. /usr/local/bin/) and then copy those desktop files to a Freedesktop.org-specified applications directory on your system (e.g. /usr/local/share/applications or ~/.local/share/applications/). - Edit those desktop files with the absolute path to the Textadept executables and then copy those desktop files to an applications directory.
- Edit those desktop files with the absolute path to the Textadept executables and then double-click the desktop file you want to run.
Picking 1 or 2 shows Textadept in your desktop environment’s menu system (GNOME, KDE, XFCE, etc.).
You can properly set Textadept’s icon by either copying Textadept’s core/images/textadept.svg to a Freedesktop.org-specified “hicolor” theme directory (e.g. /usr/share/icons/hicolor/scalable/apps or ~/.local/share/icons/hicolor/scalable/apps), or by editing Textadept’s desktop files to set “Icon” to the absolute path to core/images/textadept.svg.
Note: if you compiled Textadept, using CMake to install it will do all this for you.
- Create a symbolic link to the executables from somewhere in your
Textadept accepts the following command line arguments:
| Option | Description |
|---|---|
-e <code>, --execute <code> |
Run the given Lua code |
-f, --force |
Forces unique instance |
-h, --help |
Shows thisa |
-l <line>, --line <line> |
Jumps to a line in the previously opened file |
-L <script>, --lua <script> |
Runs the given file as a Lua script and exits |
-n, --nosession |
No state saving/restoring functionality |
-p, --preserve |
Preserve ^Q and ^S flow control sequencesb |
-s <name>, --session <name> |
Loads the given session on startupc |
-u <dir>, --userhome <dir> |
Sets alternate user data directory |
-v, --version |
Prints version and copyright infoa |
- |
Read stdin into a new buffera |
aThe terminal version does not support these.
bNon-Windows terminal version only.
cQt interprets --session for itself, so -s must be used.
Note: the -L and --lua options instructs Textadept to function as a standalone Lua
interpreter. All other command line options have no effect, but they are available to the script
via the global arg table. Textadept defines arg as it is described in the Lua manual: the
script name goes at index 0, the first argument after the script name goes at index 1, and so
on; arguments before the script name (i.e. the Textadept binary and the -L or --lua option)
go to negative indices. Textadept does not emulate Lua’s command line options or its default
package.path and package.cpath settings.
Textadept also accepts files and projects to open from the command line. For example:
textadept /path/to/file1 ../relative/path/to/file2
textadept /path/to/project/ relative/path/to/file1 relative/file2
Unless you specify a filename as an absolute path, Textadept assumes it is relative to the application’s current working directory (cwd). Textadept’s cwd is initially the command line’s cwd. (If Textadept is not being run from the command line, its cwd is unspecified.) If a project directory is specified, it becomes Textadept’s cwd, but Textadept does not open any files in that directory. If multiple project directories are specified, the last one becomes the cwd.
By default, Textadept saves its state when it exits. If you do not give Textadept any files or projects to open, do not specify a session to load, and do not disable session functionality, the editor tries to restore its state at last exit.
The GUI version of Textadept is a single-instance application – if you invoke it again while it
is already open (e.g. opening a file from a file browser or command line), the action happens in
the original instance. Pass the -f or --force command line flag to override this behavior and
run a new instance of Textadept. You can disable this behavior on Windows by creating a shortcut
to textadept.exe that passes this flag and use that shortcut to run Textadept. Similarly on
Linux, you can set up your button or menu launchers to pass the flag to the textadept or
textadept-gtk executables.
Textadept can run as a portable application, for example from a USB flash drive. Normally, all
settings and user data is stored in ~/.textadept/. However, you can override this user directory
using the -u or --userhome command line option. For example, invoking textadept.exe with
the command line arguments -u userdata will read from and store settings and user data to a
userdata/ directory located inside an installation of Textadept. You can create a Windows
shortcut that passes these command line arguments to the Textadept executable and use that
shortcut to run Textadept portably.
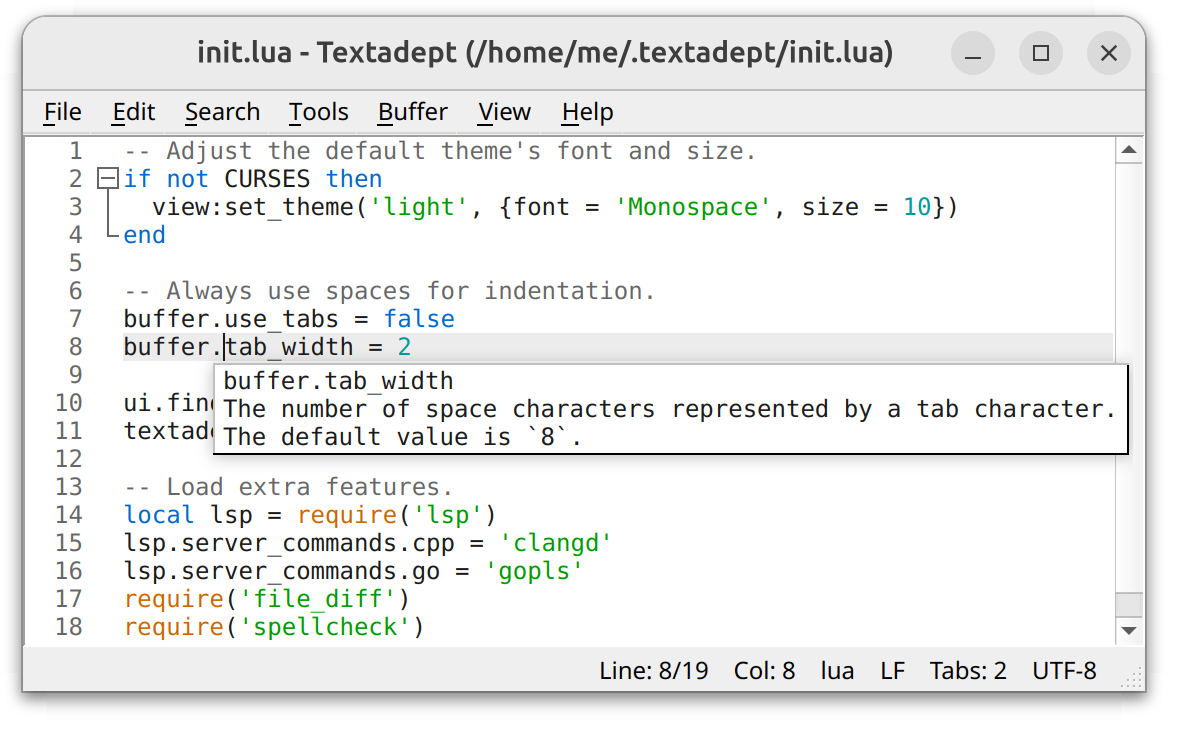
Preferences
The special file ~/.textadept/init.lua is a Lua script where you specify your editor preferences and customize what the application does when it starts. Open it using the “Edit > Preferences” menu item. It is initially empty. You can use this file to:
- Set a color theme and change the default font.
- Specify default buffer and view settings.
- Change the settings of existing modules.
- Load custom modules.
- Configure key bindings.
- Extend menus.
- Enhance support for file types and programming languages.
- Run arbitrary Lua code.
- And more!
These topics will be covered throughout this manual. Textadept’s comprehensive Lua API includes all configurable settings for buffers, views, and modules.
Here is a sample ~/.textadept/init.lua for illustration:
-- Adjust the default theme's font and size.
if UI ~= 'terminal' then
	view:set_theme('light', {font = 'Monospace', size = 12})
end

-- Always use spaces for indentation.
io.detect_indentation = false
buffer.use_tabs = false
buffer.tab_width = 2

-- Always strip trailing spaces on save, automatically highlight the current
-- word, and use C89-style block comments in C code.
textadept.editing.strip_trailing_spaces = true
textadept.editing.highlight_words = textadept.editing.HIGHLIGHT_CURRENT
textadept.editing.comment_string.c = '/*|*/'

-- Create a key binding to the "Edit > Preferences" menu item.
if OS ~= 'macos' and UI ~= 'terminal' then
	keys['ctrl+,'] = textadept.menu.menubar['Edit/Preferences'][2]
end

-- Load an external module and bind a key to it.
local lsp = require('lsp')
keys['ctrl+f12'] = lsp.goto_declaration

-- Recognize .luadoc files as Lua code.
lexer.detect_extensions.luadoc = 'lua'

-- Change the run commands for Lua and Python
textadept.run.run_commands.lua = 'lua5.1 "%f"'
textadept.run.run_commands.python = 'python3 "%f"'

-- Always use PEP-8 indentation style for Python files, and spaces for YAML files.
events.connect(events.LEXER_LOADED, function(name)
	if name == 'python' or name == 'yaml' then
		buffer.use_tabs = false
		buffer.tab_width = 4
	end
end)
Note: ~/.textadept/init.lua must not call any functions that create buffers and views
(e.g. ui.print(), io.open_file(), and buffer.new()) at file-level scope. Buffers and
views can only be created within functions assigned to keys, associated with menu items, or
connected to events.
User Interface
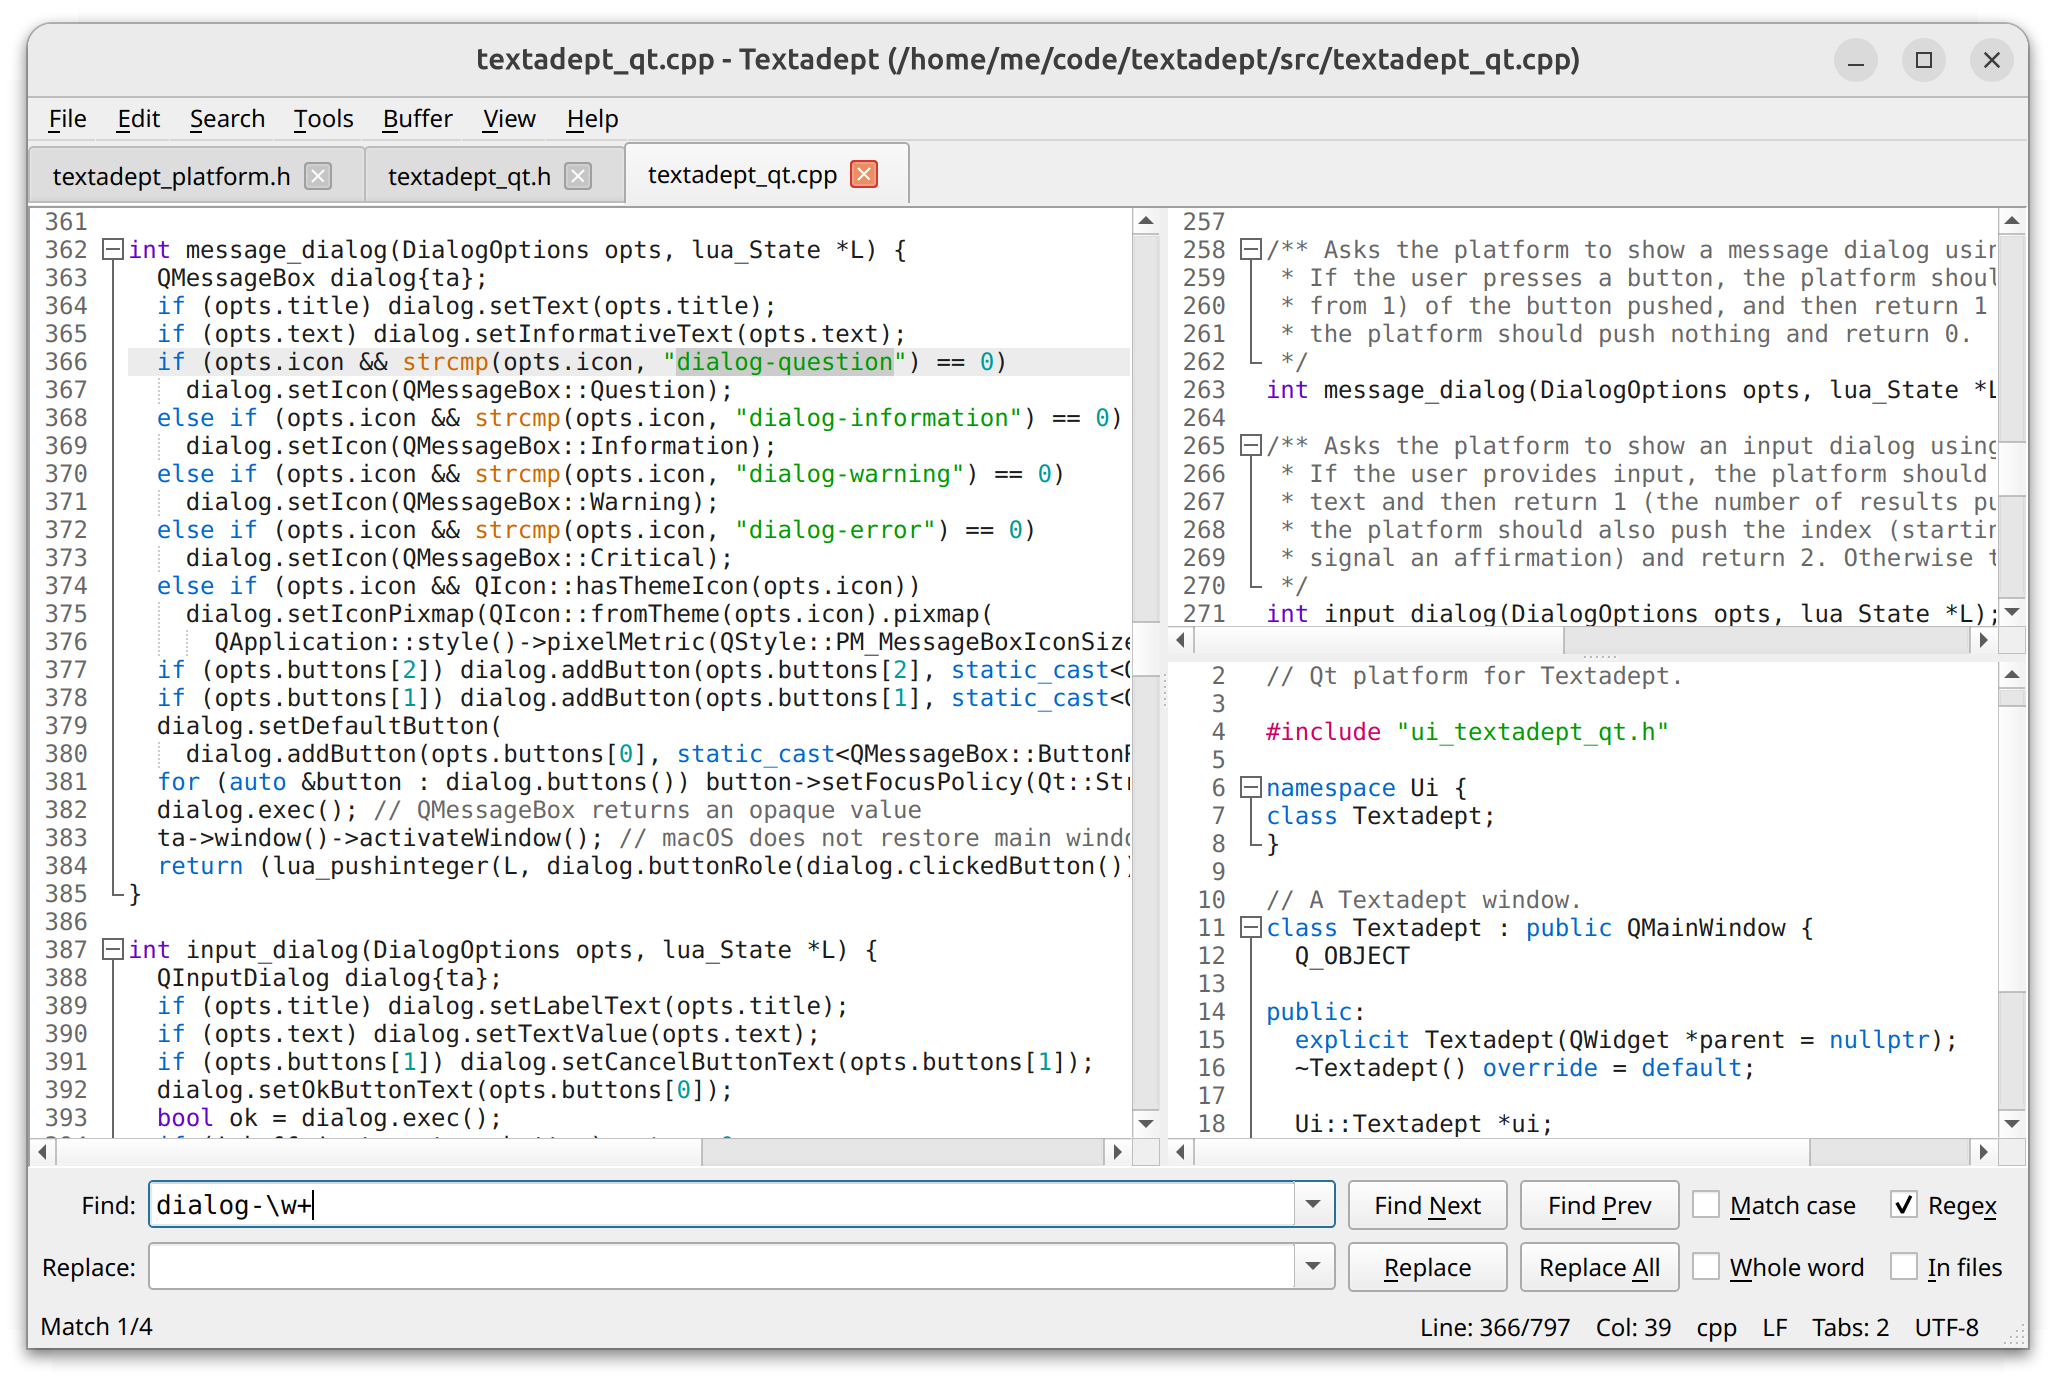
Textadept’s user interface is sleek and simple. It consists of:
- Completely customizable menu bar
- Scrollable tab bar
- Editor view with unlimited split views
- Find & replace pane (initially hidden)
- Command entry (initially hidden)
- Statusbar and document statusbar
Terminal version note: the menu bar and tab bar are not supported.
The titlebar shows the name and path of the current, active buffer. A ‘*’ character, if present, indicates there are unsaved changes in that buffer.
Textadept’s user interface has been translated into a few different languages. When the application
starts, it attempts to auto-detect your language settings by reading from the $LANG environment
variable. If this fails, or if the editor does not support your language, it falls back on
English. You can manually set your locale by copying one of the locale configuration files from
Textadept’s core/locales/ to your ~/.textadept/ directory and renaming it locale.conf. If
you would like to translate Textadept into your language, please translate the English messages
in core/locale.conf and send me (see the bottom of README.md) the modified file for inclusion
in a future release.
Menu
The menu bar provides access to nearly all of Textadept’s editing features. Almost every
menu item has a key binding for quick access. Some languages and platforms also provide menu
mnemonics for opening and selecting menu items. For example, on Windows and Linux/BSD with
the English language, Alt+E opens the “Edit” menu, S opens the “Select” sub-menu, and L
invokes the “Select Line” menu item.
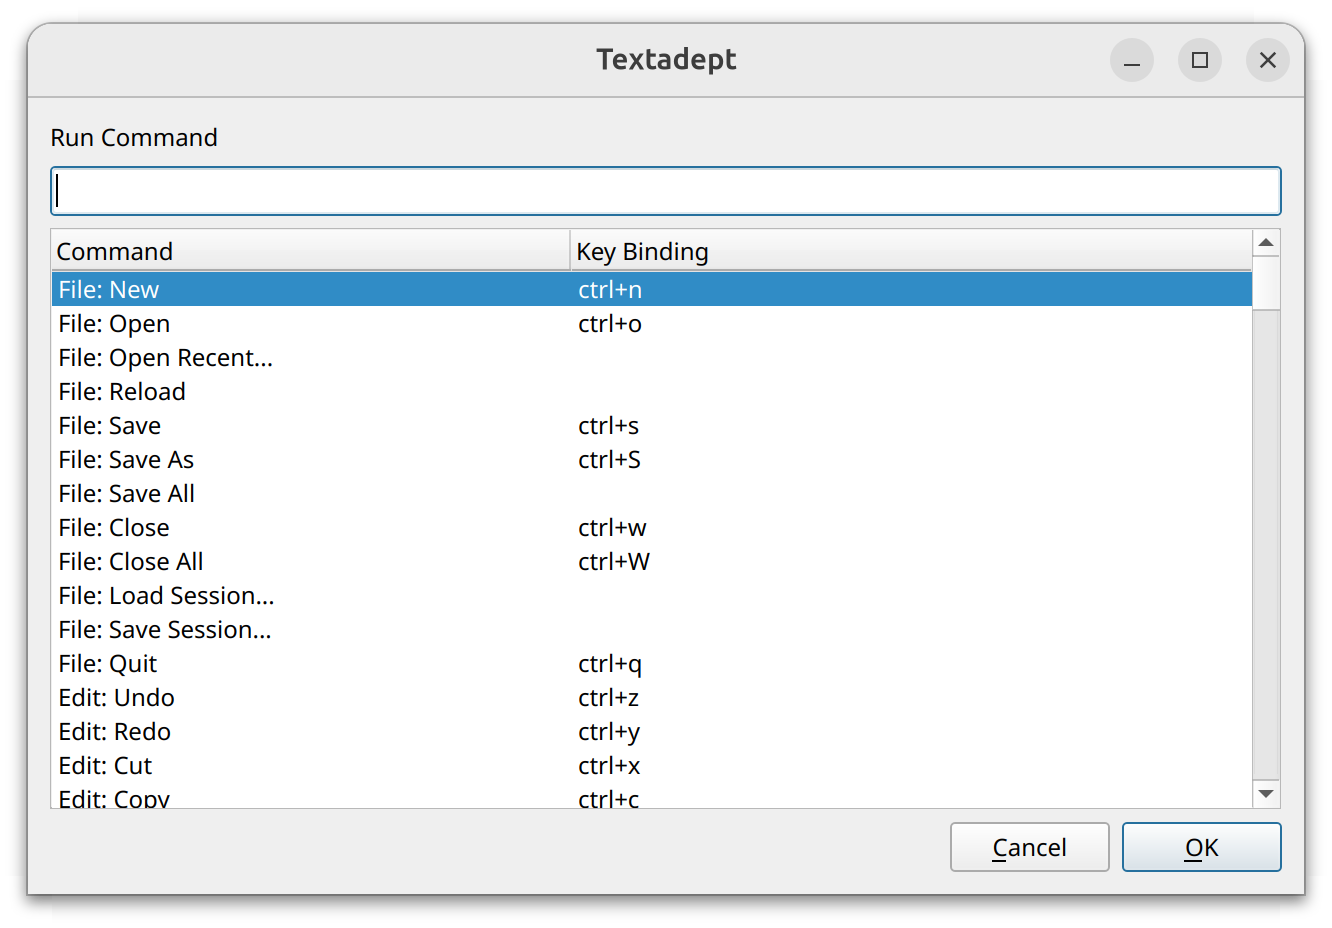
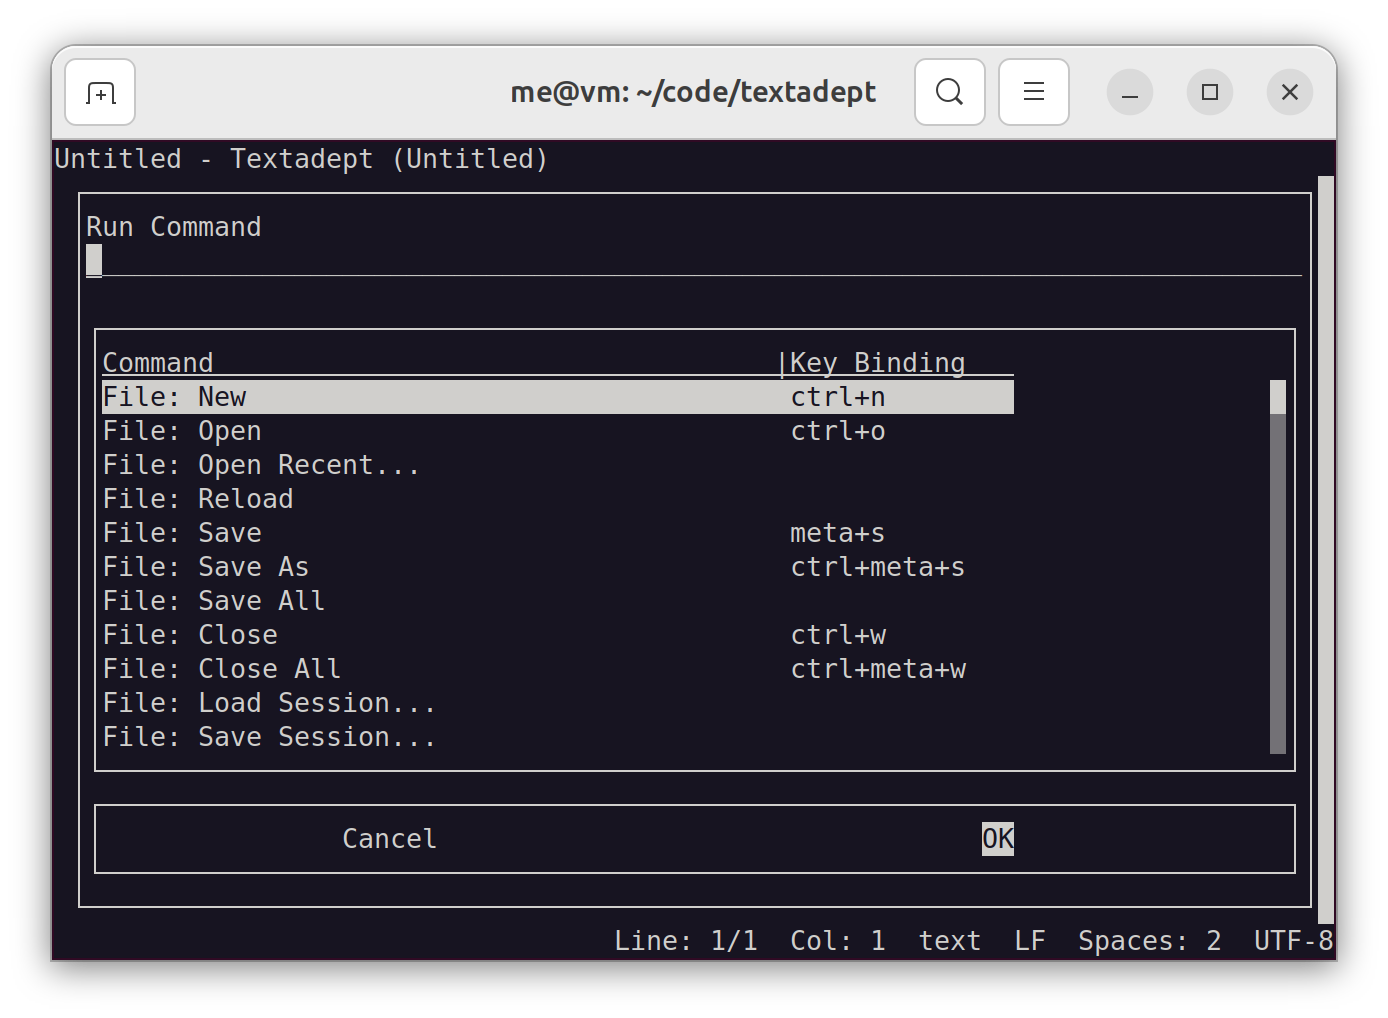
Textadept’s menu items are also accessible in the form of a searchable dialog via Ctrl+P
on Windows and Linux/BSD, ⌘P on macOS, and ^P in the terminal version. (Despite the fact
that the terminal version does not have a menu, it does have this dialog.) Typing part of the
name of any command in the dialog filters the list, with spaces being wildcards. The arrow
keys move the selection up and down. Pressing Enter, selecting OK, or double-clicking on a
command invokes it. (The terminal version requires pressing Enter.) Using this dialog is an
alternative to navigating the menus or remembering key bindings. You can also use it to quickly
look up key bindings for particular commands.
Note: some commands have more than one key binding, but only one of those bindings (chosen at random) is shown in the menu and dialog.
You can extend Textadept’s menu (and dialog) with your own menus, sub-menus, and menu items by
modifying the textadept.menu.menubar table. For example, in your ~/.textadept/init.lua:
local tools = textadept.menu.menubar['Tools']
tools[#tools + 1] = {''} -- separator
tools[#tools + 1] = {'Reset L&ua State', reset} -- mark 'u' as the mnemonic
Tab Bar
The tab bar displays all of Textadept’s open buffers by name, though it is only visible when
two or more buffers are open. A ‘*’ character, if present, indicates there are unsaved changes
in the marked buffer. When two or more views are open, the active tab applies to the active
view, and clicking on a tab switches to its buffer in that view. Right-clicking on the tab bar
brings up a context menu. Rearrange tabs by clicking, dragging, and dropping them. Toggle the
visibility of the tab bar (as long as more than one buffer is open) using the “Buffer > Toggle
Tab Bar” menu item. Turn off the tab bar completely by setting ui.tabs. For example,
in your ~/.textadept/init.lua:
ui.tabs = false
Cycle to the next buffer via Ctrl+Tab or Ctrl+PgDn on Windows and Linux/BSD, ^⇥ or ⌘}
on macOS, and M-PgDn in the terminal version. Cycle to the previous buffer via Ctrl+Shift+Tab
or Ctrl+PgUp, ^⇧⇥ or ⌘{, and M-PgUp.
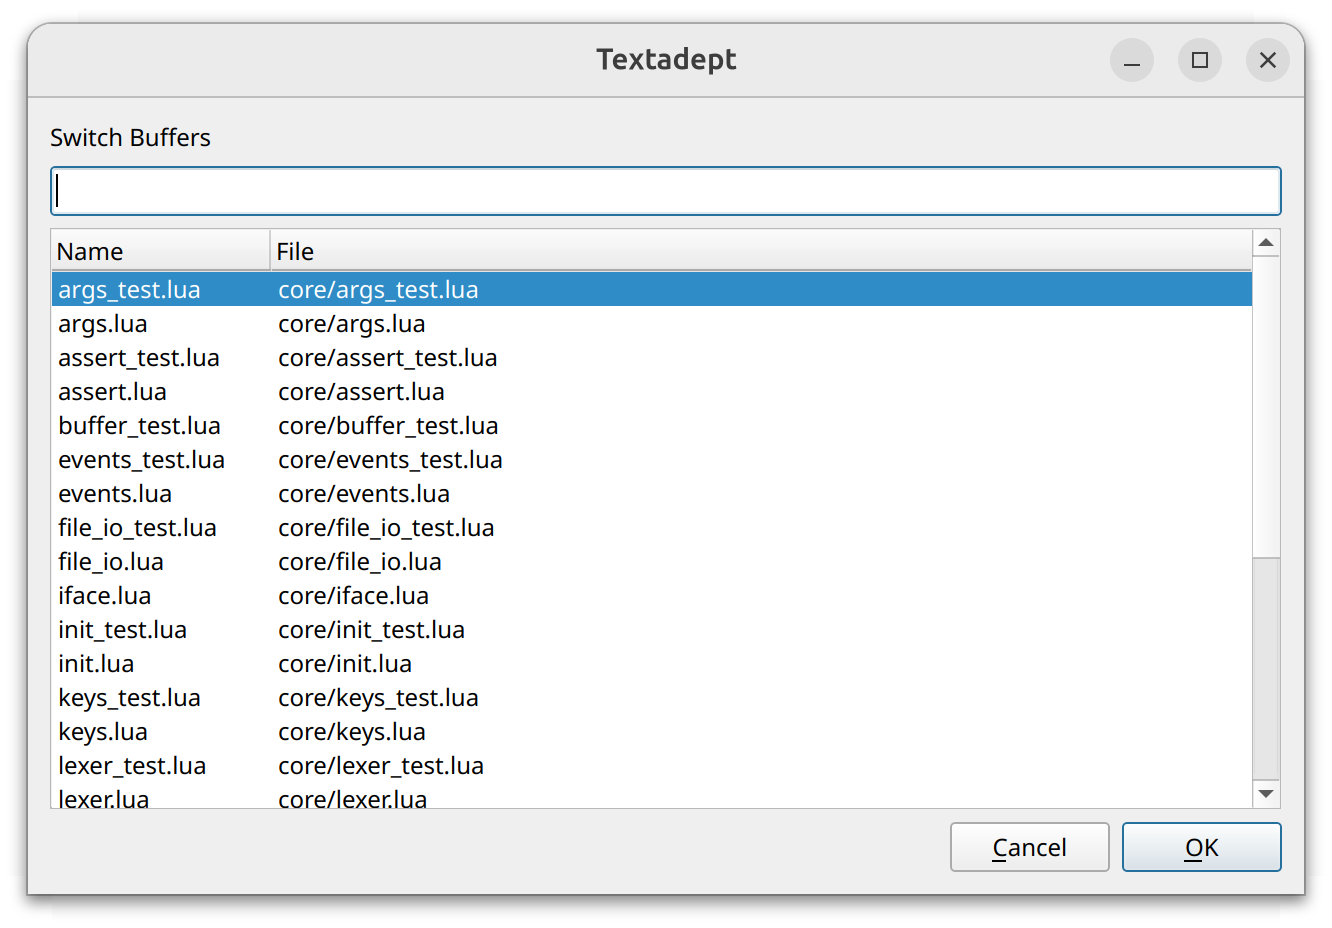
Textadept’s tabs are also accessible in the form of a searchable dialog via Ctrl+B on Windows
and Linux/BSD, ⌘B on macOS, and ^B in the terminal version. (Despite the fact that the
terminal version does not have a tab bar, it does have this dialog.) The dialog displays a
list of currently open buffers. Typing part of any filename filters the list, with spaces
being wildcards. The arrow keys move the selection up and down. Pressing Enter, selecting
OK, or double-clicking on a buffer switches to it. (The terminal version requires pressing
Enter.) This feature is particularly useful when many files are open, and navigating through
the tab bar is tedious.

The dialog shows more recently used buffers towards the top. You can change the dialog show
buffers in left-to-right tab order by setting ui.buffer_list_zorder. For example, in
your ~/.textadept/init.lua:
ui.buffer_list_zorder = false
Editor View
The editor view is where you will spend most of your time in Textadept. You can split it vertically and horizontally as many times as you like, and you can view the same buffer in two or more separate views. Resize split views by clicking and dragging on the splitter bar that separates them. Right-clicking inside a view brings up a context menu.
- Split a view horizontally into top and bottom views via
Ctrl+Alt+_on Windows and Linux/BSD,^⌘_on macOS, andM-_in the terminal version. - Split a view vertically into side-by-side views via
Ctrl+Alt+|on Windows and Linux/BSD,^⌘|on macOS, andM-|in the terminal version. - Cycle to the next split view via
Ctrl+Alt+PgDnon Windows and Linux/BSD,^⌘}or^⌘⇟on macOS, andM-^PgDnin the terminal version. - Cycle to the previous split view via
Ctrl+Alt+PgUpon Windows and Linux/BSD,^⌘{or^⌘⇞on macOS, andM-^PgUpin the terminal version. - Grow or shrink a view via
Ctrl+Alt++orCtrl+Alt+-, respectively, on Windows and Linux/BSD;^⌘+or^⌘-, respectively, on macOS; andM-+orM--in the terminal version. - Unsplit the current view by removing its complement view(s) via
Ctrl+Alt+Won Windows and Linux/BSD,^⌘Won macOS, andM-Win the terminal version. - Unsplit the current view by removing all other views via
Ctrl+Alt+Shift+Won Windows and Linux/BSD,^⌘⇧Won macOS, andM-S-Win the terminal version.
Note: depending on the split sequence, the order when cycling between views may not be linear.
Find & Replace Pane
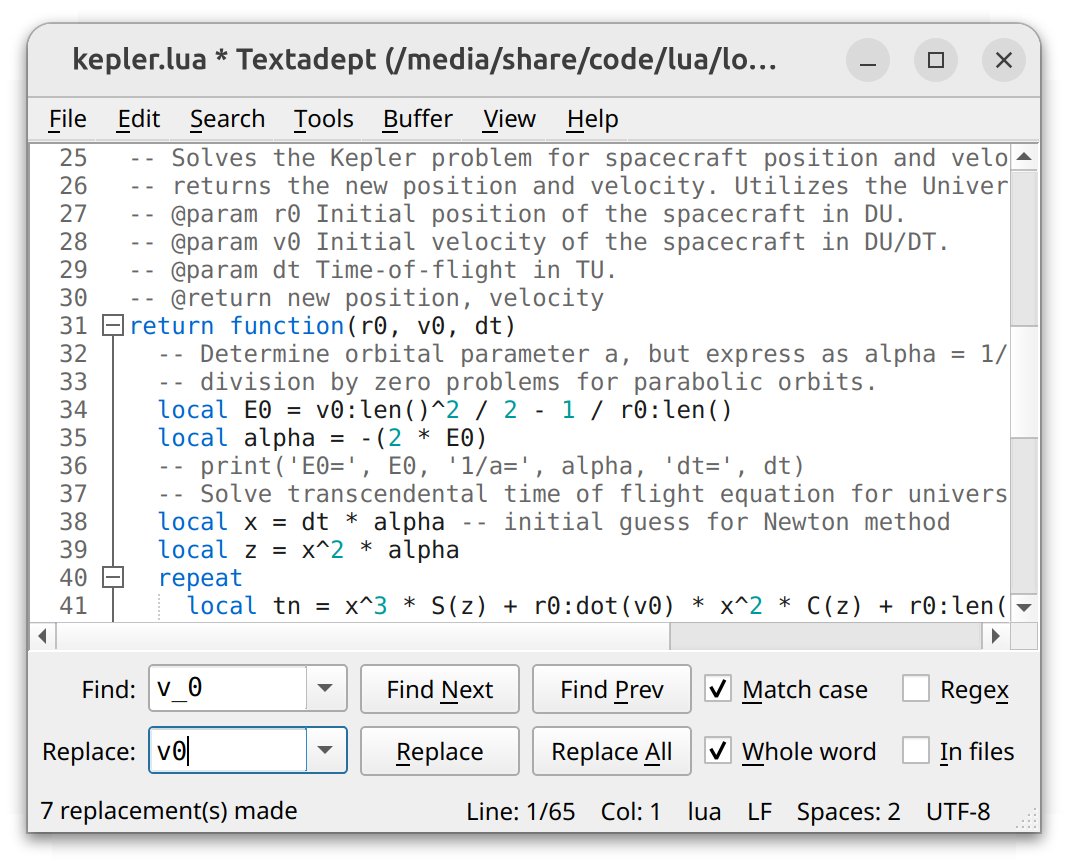
The find & replace pane searches for text in files and directories. It has the usual find and replace functionality you would expect, along with “Match Case”, “Whole Word”, “Regex”, and “In Files” options. The pane also stores find and replace history that you can cycle through.
Note: Textadept does not support multi-line searches (either regex or plain text).
Terminal version note: find and replace history is limited to 100 items each.
Summon the pane via Ctrl+F on Windows and Linux/BSD, ⌘F on macOS, and ^F in the terminal
version.
In the GUI version:
- Perform “Find Next” and “Find Prev” in the “Find” entry via
EnterandShift+Enter, respectively. - Perform “Replace” and “Replace All” in the “Replace” entry via
EnterandShift+Enter, respectively. - For at least the English locale on Windows and Linux/BSD, toggle the find options using
their button mnemonics:
Alt+M,Alt+W,Alt+X,Alt+I. On macOS, use⌥⌘M,⌥⌘W, and⌥⌘Xinstead. - Cycle through find/replace history via
UpandDownon Windows, Linux, BSD, and the terminal version; and⇡and⇣on macOS. - Dismiss the pane via
Esc.
In the terminal version:
- Switch between “Find” and “Replace” entries via
DownandUp. - Toggle between “Find Next” and “Find Prev” in the “Find” entry via
Tab. - Toggle between “Replace” and “Replace All” in the “Replace” entry via
Tab. - Perform the highlighted find/replace action via
Enter. - Toggle the find options via
F1,F2,F3, andF4. - Cycle through find/replace history via
^Pand^N. - Erase the contents of the focused entry via
^U. - Dismiss the pane via
Esc.
When the “Regex” find option is enabled, the “Replace” entry interprets the following character sequences:
\1through\9represent their captured matching region’s text, and\0represents all matched text.\Uand\Lconverts everything up to the next\L,\U, or\Eto uppercase and lowercase, respectively. (\Eturns off conversion.)\uand\lconverts the next character to uppercase and lowercase, respectively. These may appear within\Uand\Lconstructs.
Tip: by default, “Replace All” replaces all text in the buffer. Selecting text and then performing “Replace All” replaces all text in that selection only.
Tip: You can make Textadept automatically highlight all instances of found text in
the current buffer by setting ui.find.highlight_all_matches. For example, in your
~/.textadept/init.lua:
ui.find.highlight_all_matches = true
While the find & replace pane is closed, you can still perform its actions:
- Perform “Find Next” via
Ctrl+GorF3on Windows and Linux/BSD,⌘Gon macOS, and^Gin the terminal version. - Perform “Find Prev” via
Ctrl+Shift+GorShift+F3on Windows and Linux/BSD,⌘⇧Gon macOS, andM-^Gin the terminal version. - Perform “Replace” via
Ctrl+Alt+Pon Windows and Linux/BSD,^⌘Pon macOS, andM-Pin the terminal version. - Perform “Replace All” via
Ctrl+Alt+Shift+Pon Windows and Linux/BSD,^⌘⇧Pon macOS, andM-S-Pin the terminal version.
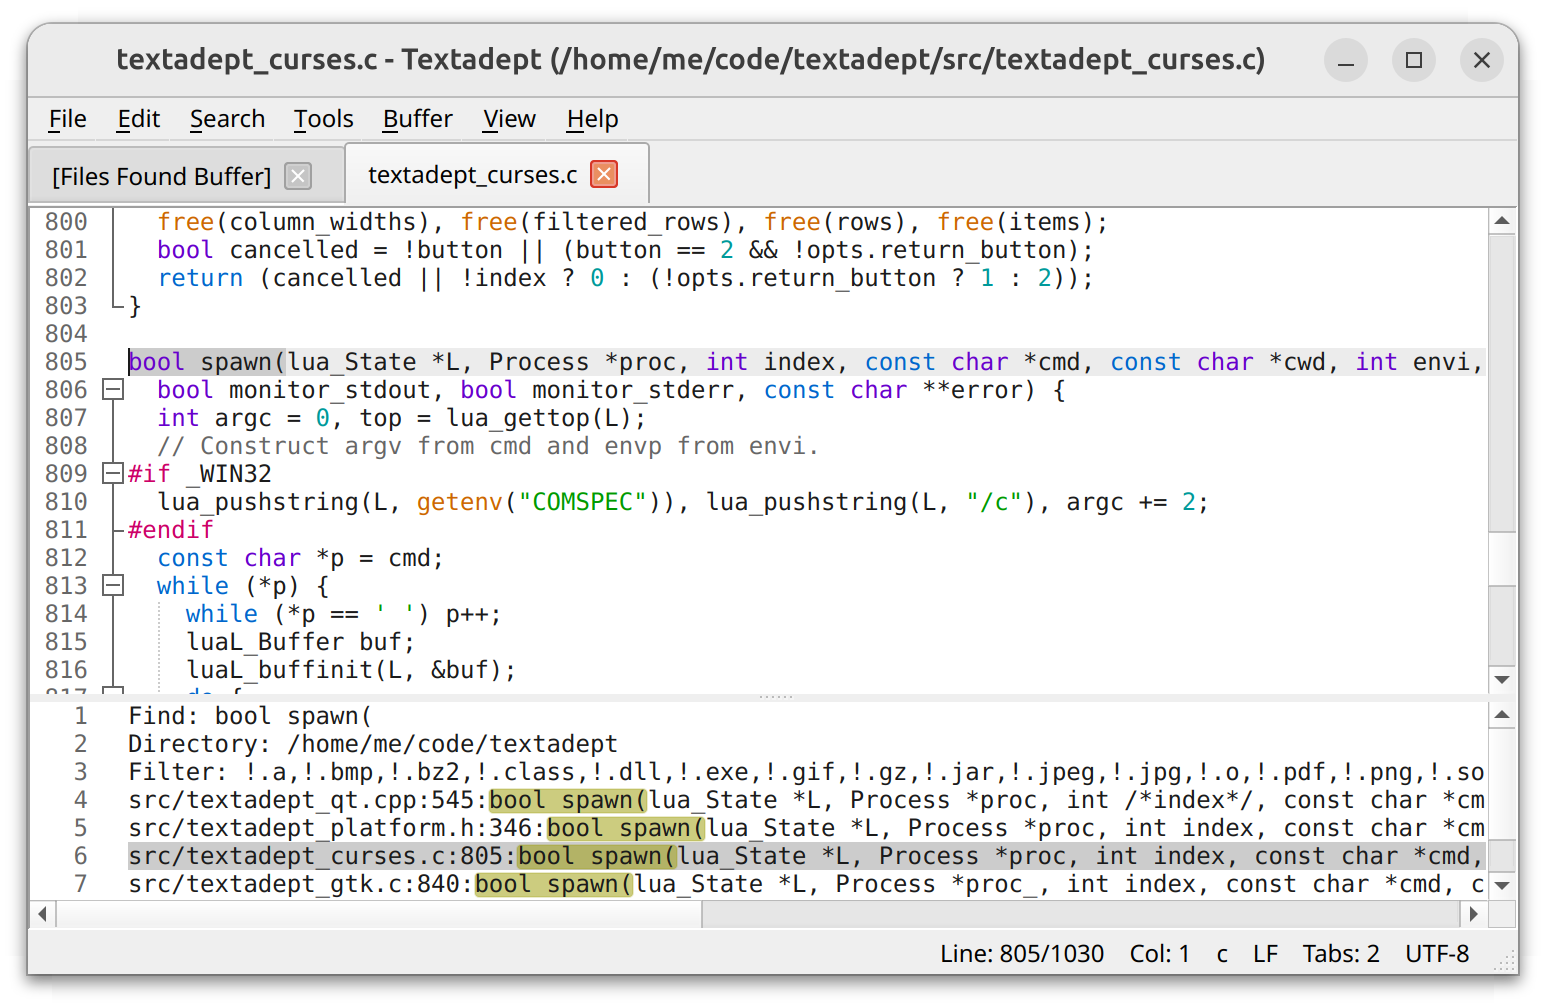
Find in Files
Textadept can search for text within multiple files and directories via Ctrl+Shift+F on
Windows and Linux/BSD, ⌘⇧F on macOS, and M-^F in the terminal version. Invoking “Find
Next” prompts you for a directory to search in. The “Replace” entry transforms into a “Filter”
entry that contains files and directories to include or exclude from the search.
A filter consists of a comma-separated list of shell-style glob patterns that match filenames and directories to include or exclude. The default filter excludes many common binary files and version control directories from searches. It is included with any extra items you specify.
Tip: Textadept keeps track of filters set per-directory. You can also set per-directory filters
in Lua by modifying ui.find_in_files_filters. For example, in your ~/.textadept/init.lua:
-- Only search in certain source directories.
ui.find.find_in_files_filters['/path/to/project'] = {'include/**', 'src/**'}
Textadept shows search results in a temporary buffer. Jump to the next or previous result via
Ctrl+Alt+G or Ctrl+Alt+Shift+G, respectively, on Windows and Linux/BSD; ^⌘G or ^⌘⇧G,
respectively, on macOS; and M-G or M-S-G, respectively, in the terminal version. You can
also double-click on a result to jump to it, or use the arrow keys to navigate within the list
and press Enter.
Incremental Find
Textadept searches for text incrementally as you type when you summon the find & replace pane via
Ctrl+Alt+F on Windows and Linux/BSD, ^⌘F on macOS, and M-F in the terminal version. The
“In Files” option does not apply in this mode.
Command Entry
The command entry has many different roles:
- Execute Lua commands and change buffer, view, and module settings.
- Filter text through shell commands.
- Invoke shell commands to run code, build projects, or execute tests.
- And more.
Each role has its own history that can be cycled through via the Up and Down key bindings
on Windows, Linux, BSD, and the terminal version; and ⇡ and ⇣ on macOS.
Lua Command Entry
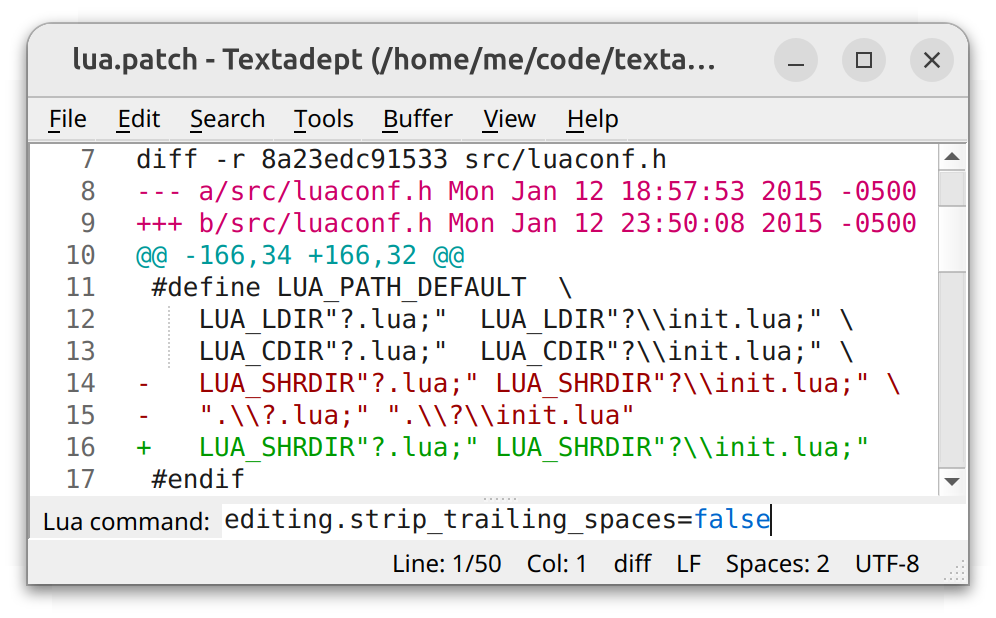
Open the Lua command entry via Ctrl+E on Windows and Linux/BSD, ⌘E on macOS, and ^E
in the terminal version. Type in the Lua command or code to run and press Enter to execute
it. Textadept’s Lua API contains all of the application’s built-in commands, settings, etc.
Show code completion candidates via Tab on Windows, Linux, BSD, and the terminal version;
and ⇥ on macOS. Use the arrow keys to make a selection and press Enter to insert it.
Lua code here runs in a modified environment for your convenience:
- The contents (keys) of the following tables are global variables:
- The first argument to
bufferandviewfunctions may be omitted. - Commands with no arguments may omit the parentheses.
For example:
| Lua code | Command entry equivalent |
|---|---|
buffer:reload() |
reload |
view:split(true) |
split(true) |
ui.tabs = false |
tabs = false |
textadept.keys['ctrl+n'] = buffer.new |
keys['ctrl+n'] = new |
Warning: Textadept will not prevent you from wrecking its internal Lua state, so please be careful.
Tip: Textadept’s -e and --execute command line arguments run the given code as if
it was entered in the editor’s Lua command entry. Since the GUI version of Textadept is a
single-instance application, you can send commands to that instance. For example:
textadept /path/to/file &
textadept -e "io.open_file('/path/to/another/file')"
Shell Command Entry and Filtering Text
Filter text through shell commands via Ctrl+| on Windows and Linux/BSD, ⌘| on macOS, and
^\ or ^| in the terminal version. For example, filtering a buffer’s text through the Unix
sort command will sort that buffer’s lines.
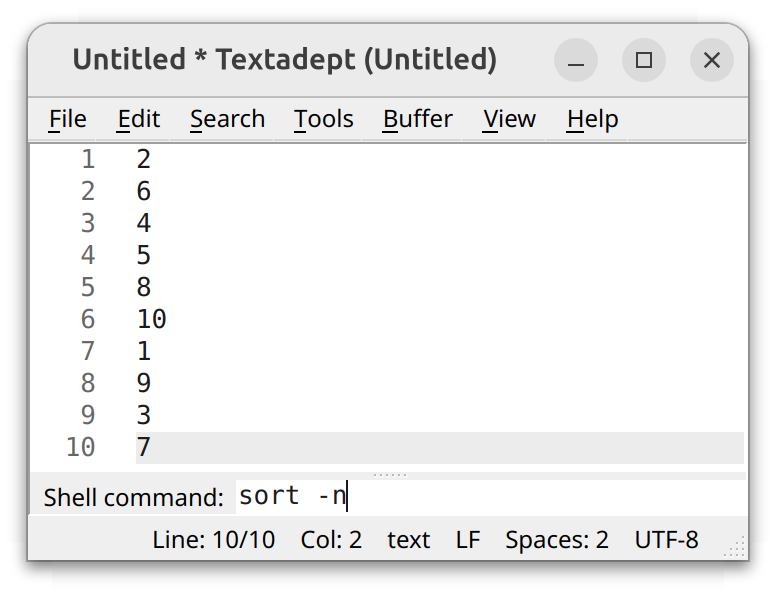
Text passed as standard input to shell commands is determined as follows:
- If no text is selected, the entire buffer’s text is used.
- If text is selected and either spans a single line, is a multiple selection, or is a rectangular selection, only that selected text is used.
- If text is selected and spans multiple lines, all text on those lines is used. However, if the end of the selection is at the beginning of a line, that line is omitted.
The command’s standard output replaces its input text.
Warning: commands that emit stdout while reading stdin (as opposed to emitting stdout only after stdin is closed) may hang the GTK and terminal versions of Textadept if input generates more output than stdout can buffer. For example, on Linux stdout may only be able to buffer 64K while there is still incoming input.
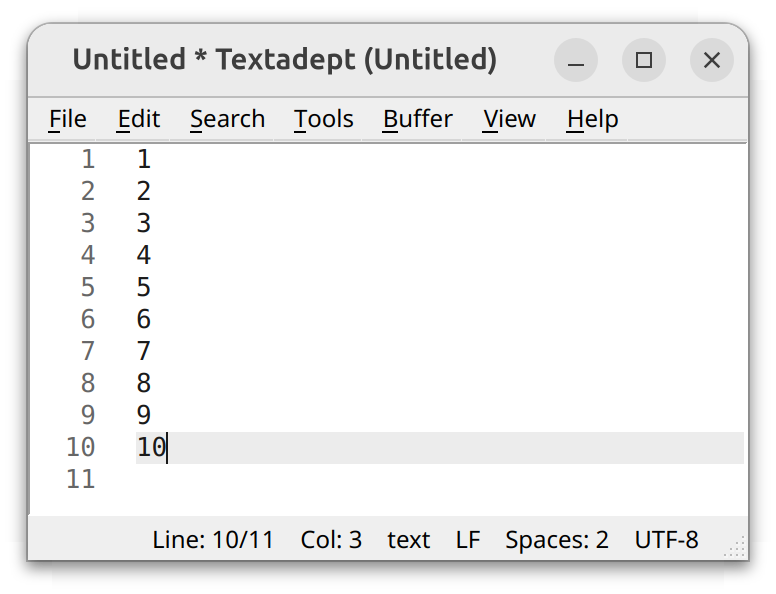
Statusbar
The statusbar consists of two parts:
- Temporary status messages.
- Buffer status information.
Buffer status information includes:
- Current line and column number.
- Lexer language name for syntax highlighting and language-specific functionality.
- Line ending mode (EOL mode): either CRLF (“\r\n”) or LF (‘\n’). Line endings are the characters that separate lines.
- Indentation settings: an indentation mode (either tabs or spaces) and an indentation size (how many space characters are represented in a tab or in one level of indentation).
- Buffer encoding: how the buffer’s text is saved to or read from the filesystem.
Working with Files and Projects
Textadept provides many ways to open files:
- Open, using a standard file chooser dialog, one or more files in a single directory via
Ctrl+Oon Windows and Linux/BSD,⌘Oon macOS, and^Oin the terminal version. - Open, using a quick open dialog, one or more files in the current project or Textadept’s
current working directory via
Ctrl+Shift+Oon Windows and Linux/BSD,^⌘Oon macOS, andM-^Oin the terminal version. Typing part of any filename filters the list, with spaces being wildcards. The arrow keys move the selection up and down. Holding downShiftwhile pressing the arrow keys selects multiple files, as does holding downCtrlwhile clicking. PressingEnteror selectingOKopens all selected files. Double-clicking on a single file opens it. (The terminal version requires pressingEnter.) - Open, using a quick open dialog, one or more files in the directory of the currently opened file using the “Tools > Quick Open > Quickly Open Current Directory” menu item.
- Open a file by dragging it from a file manager and dropping it into one of Textadept’s views.
- Open a recently opened file from a list of recent files via the “File > Open Recent…” menu item.
- Open, using a quick open dialog, one or more files in ~/.textadept/ via
Ctrl+Alt+Uon Windows and Linux/BSD,⌘⇧Uon macOS, andM-Uin the terminal version. - Reopen the currently opened file, discarding any unsaved changes, using the “File > Reload” menu item. (Textadept prompts you do this if the editor detects it has been modified externally.)
Windows Note: Due to limitations in Lua and Microsoft’s C runtime (MSVCRT), Textadept can only open files whose filenames contain characters in the system’s encoding, even if Windows properly displays characters outside that encoding. For example, if the system’s encoding is CP1252 (English and most European languages), Textadept cannot open a filename that contains Japanese characters in it. This limitation only exists for file names, not file contents.
Projects
Textadept’s only concept of a project is a parent directory under a recognized form of version control (Git, Mercurial, SVN, Bazaar, and Fossil). There is no “Open Project” action. Textadept can work with multiple projects at once, since the current project depends largely on context:
- If the current buffer is a file, Textadept walks up its parent directory tree, looking for a version control directory. If one is found, its parent directory is the current project.
- Textadept walks up its current working directory (cwd) tree, looking for a version control directory. If one is found, its parent directory is the current project.
- If no version control directory is found, there is no current project.
Tip: you can specify Textadept’s current working directory by passing it on the command
line when running the application. This effectively starts Textadept with a “default
project”. You can also change the current working from within the editor by running the
lfs.chdir('/path/to/folder') command in the Lua command entry.
Textadept’s quick open dialog for opening a file from the current project displays the first
5000 files it finds. You can increase this limit by changing io.quick_open_max. You can
also filter out certain file types from showing in the list by adding a project-specific filter
to io.quick_open_filters. For example, in your ~/.textadept/init.lua:
io.quick_open_max = 10000 -- support huge projects
io.quick_open_filters['/path/to/project'] = {'include/**', 'src/**'} -- only show these directories
A filter consists of a comma-separated list of shell-style glob patterns that match filenames and directories to include or exclude. The default filter excludes many common binary files and version control directories from searches. It is included with any extra items you specify.
You can mimic a more traditional approach to projects by saving and loading project-specific
sessions using the “File > Save Session…” and “File > Load Session…” menu items, respectively,
as well as using the -s and --session command line arguments. Textadept stores session
files in ~/.textadept/, and the default session name is “session”.
Language
Textadept attempts to identify the programming language associated with files it opens and assign a lexer for syntax highlighting:
- The first line of the file is checked against the Lua patterns
in
lexer.detect_patterns. If there is a match, Textadept uses the lexer associated with that matching pattern. - The file’s extension is checked against those in
lexer.detect_extensions. If there is a match, Textadept uses the lexer associated with that extension. If the file does not have an extension, Textadept uses the entire file name in the check. - Textadept falls back on a plain text lexer.
You can change or add lexers associated with first line patterns, file extensions, and file
names by modifying lexer.detect_patterns and lexer.detect_extensions. For example, in your
~/.textadept/init.lua:
lexer.detect_patterns['^#!.+/zsh'] = 'bash'
lexer.detect_extensions.luadoc = 'lua'
Textadept has lexers for more than 100 different programming languages, but if it is missing a lexer for your language, you can write one, place it in your ~/.textadept/lexers/ directory, and add an extension and/or pattern for it.
Tip: placing lexers in your user data directory avoids the possibility of you overwriting them when you update Textadept.
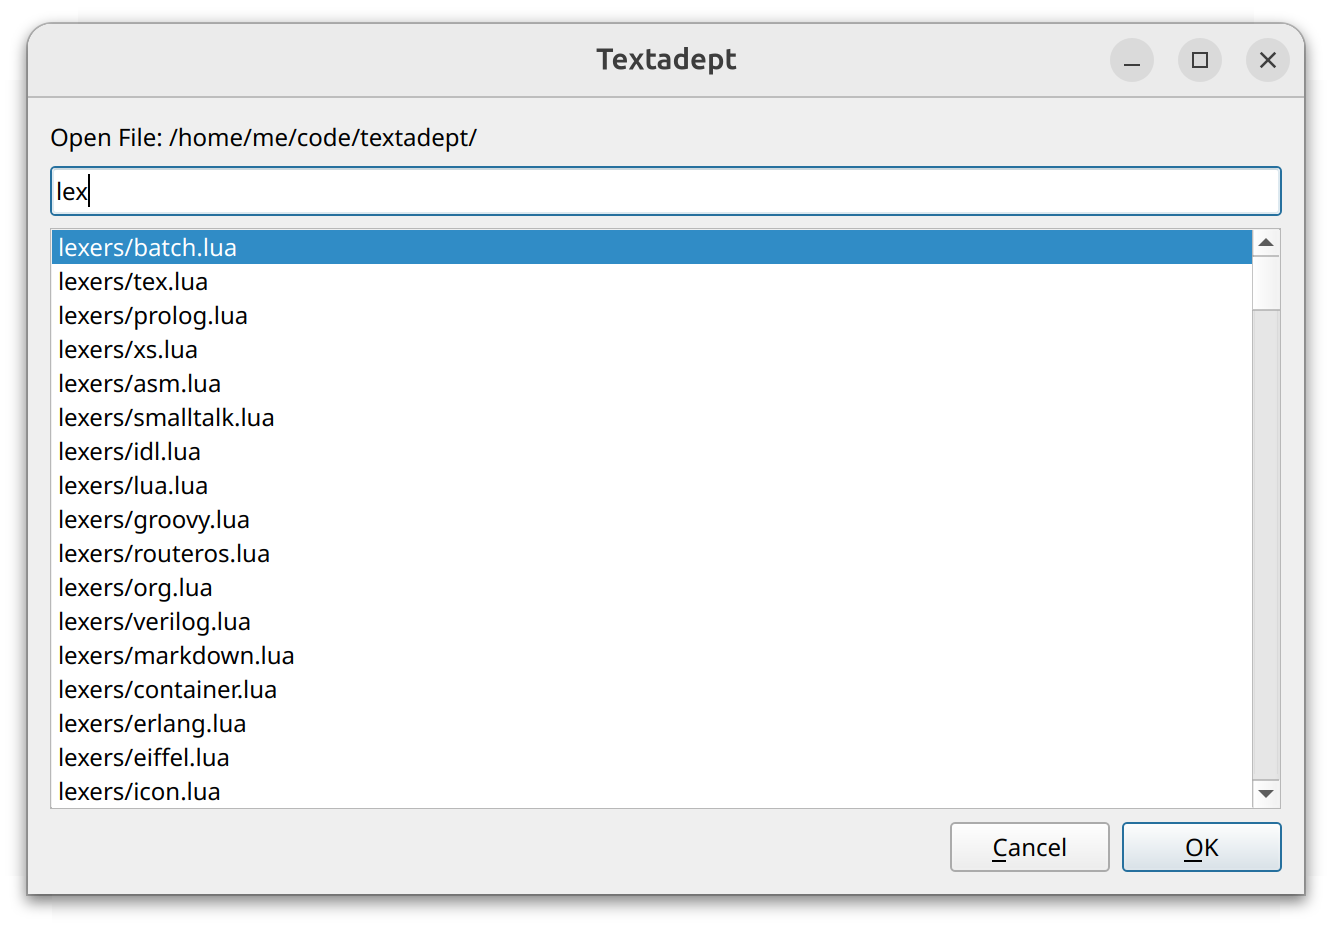
You can manually change a buffer’s lexer via Ctrl+Alt+L on Windows and Linux/ BSD, ^⌘L
on macOS, and M-L in the terminal version. Typing part of a lexer name in the dialog filters
the list, with spaces being wildcards. The arrow keys move the selection up and down. Pressing
Enter, selecting OK, or double-clicking on a lexer assigns it to the current buffer. (The
terminal version requires pressing Enter.)
End of Line Mode
Textadept attempts to detect a file’s end-of-line mode (EOL mode), falling back on CRLF (“\r\n”) by default on Windows, and LF (‘\n’) on all other platforms. You can manually change this mode using the “Buffer > EOL Mode” menu.
Indentation
Textadept also attempts to identify a file’s indentation settings, though the editor is more likely to misidentify files with mixed indentation.
You can manually change a buffer’s indentation by following these steps:
- Toggle between using tabs and spaces via
Ctrl+Alt+Ton Windows and Linux/BSD,^⌘Ton macOS, andM-Tin the terminal version. - Set the indentation size using the “Buffer > Indentation” menu.
- Optionally convert existing indentation to the new indentation settings using the “Buffer > Indentation > Convert Indentation” menu item.
The default indentation setting is a tab representing 8 spaces, but you can change this globally and on a language-specific basis. For example, in your ~/.textadept/init.lua:
-- Disallow auto-detection of indentation.
io.detect_indentation = false

-- Default indentation settings for all buffers.
buffer.use_tabs = false
buffer.tab_width = 2

-- Indentation settings for individual languages.
events.connect(events.LEXER_LOADED, function(name)
	if name == 'python' or name == 'yaml' then
		buffer.use_tabs = false
		buffer.tab_width = 4
	elseif name == 'go' then
		buffer.use_tabs = true
		buffer.tab_width = 4
	end
end)
Encoding
Textadept attempts to detect a file’s character encoding, either UTF-8, ASCII, CP1252, or UTF-16. If you have files with other encodings, you can either:
-
Add those encodings to the
io.encodingstable before opening the file. For example, in your ~/.textadept/init.lua:io.encodings[#io.encodings + 1] = 'UTF-32' table.insert(io.encodings, 3, 'CP936') -- before CP1252 -- Optionally add an item to the "Buffer > Encoding" menu. local menu = textadept.menu.menubar['Buffer/Encoding'] local encoding = 'UTF-32' menu[#menu + 1] = {encoding, function() buffer:set_encoding(encoding) end} -
Change the current file’s encoding by running the
buffer:set_encoding()command in the Lua Command Entry. For example, if Textadept incorrectly detected a CP936 file as CP1252, runset_encoding('CP936')to switch the encoding to CP936.
The “Buffer > Encoding” menu also allows you to change the current file’s encoding.
View Settings
Textadept normally does not wrap long lines into view, nor does it show whitespace characters. You
can toggle line wrapping for the current buffer via Ctrl+\ on Windows and Linux/BSD, ⌘\
on macOS, and M-\ in the terminal version. You can toggle whitespace visibility for the current
buffer using the “View > Toggle View Whitespace” menu item. The editor represents visible spaces
as dots and visible tabs as arrows.
On the left side of each editor view are margins that show line numbers, bookmarks, and fold markers. You can toggle the visibility of these margins using the “View > Toggle Margins” menu item.
The GUI version of Textadept shows small guiding lines based on indentation level. You can toggle the visibility of these guides for the current view using the “View > Toggle Show Indent Guides” menu item.
The GUI version of Textadept also allows you to temporarily change the current view’s font size:
- Increase the view’s font size via
Ctrl+=on Windows and Linux/BSD, and⌘=on macOS. - Decrease the view’s font size via
Ctrl+-on Windows and Linux/BSD, and⌘-on macOS. - Reset the view’s font size to its normal value via
Ctrl+0on Windows and Linux/BSD, and⌘0on macOS.
Adept Editing
Textadept implements a commonly accepted set of text editor features and key bindings across each of its Platforms, including Bash-style key bindings on macOS and in the terminal version. The editor also has its own advanced features, many of which are described in the following sections.
Brace Matching, Auto-pair, and Typeover
Textadept highlights matching brace characters when the caret is over one of them: ‘(‘, ‘)’, ‘[’,
‘]’, ‘{‘, or ‘}’ for programming languages, and ‘<’ or ‘>’ for XML-like markup languages. Jump
to the current character’s complement via Ctrl+M on Windows and Linux/BSD, ⌘M on macOS,
and M-M in the terminal version.
The editor automatically inserts the complement of typed opening brace and quote characters,
deletes that complement if you type Backspace, and moves over the complement if you type it
(as opposed to inserting it again). You can configure or disable this behavior by modifying
textadept.editing.auto_pairs and textadept.editing.typeover_auto_paired. For example,
in your ~/.textadept/init.lua:
-- Auto-pair and typeover '*' (Markdown emphasis/strong).
textadept.editing.auto_pairs['*'] = '*'

-- Disable only typeover.
textadept.editing.typeover_auto_paired = false

-- Disable auto-pair and typeover.
textadept.editing.auto_pairs = nil
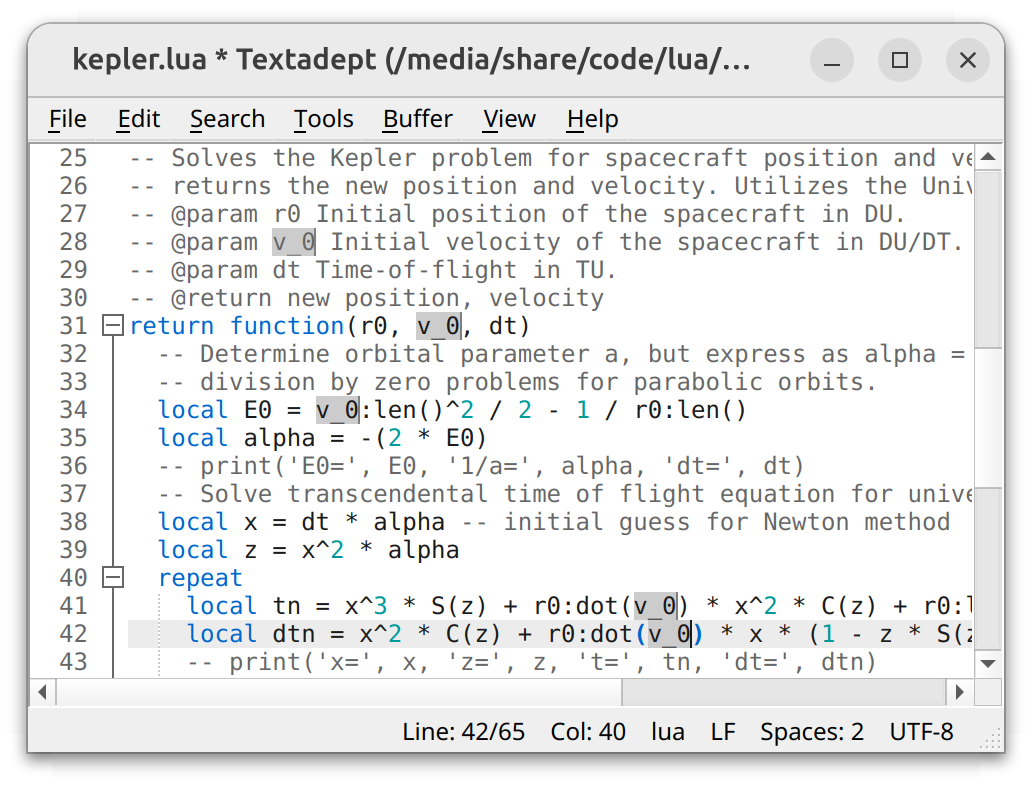
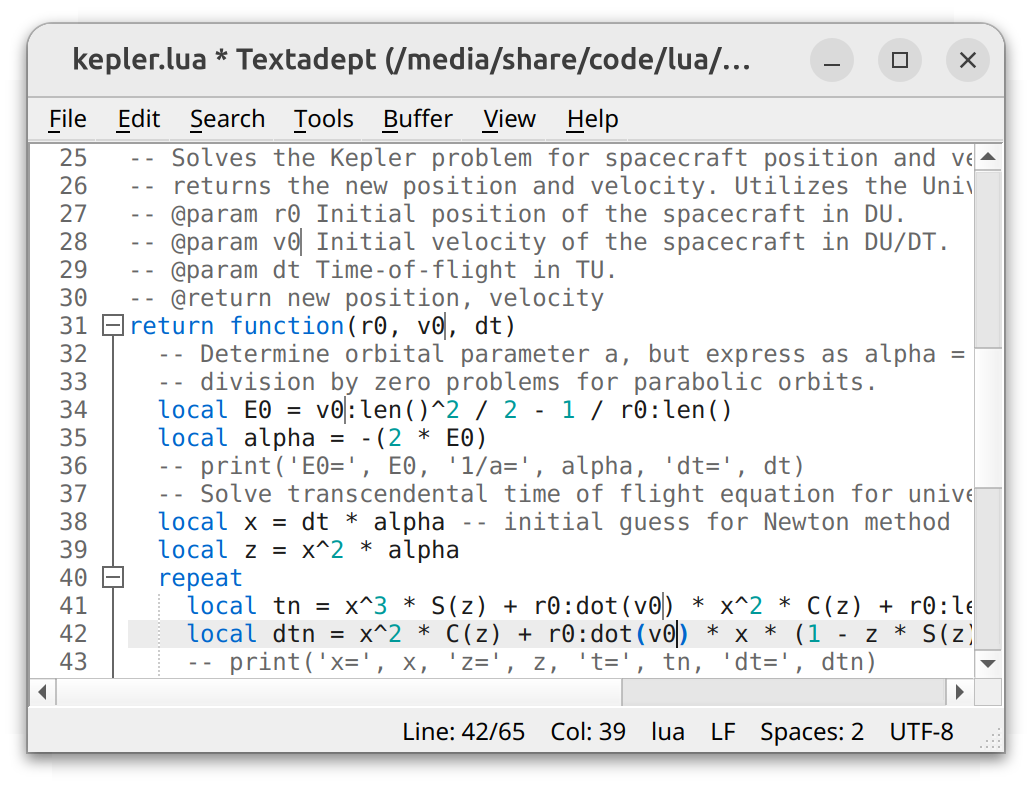
Word Highlight
Textadept can automatically highlight all occurrences of the word under the
caret, or all occurrences of the selected word (e.g. a variable name), by setting
textadept.editing.highlight_words. For example, in your ~/.textadept/init.lua:
-- Highlight all occurrences of the current word.
textadept.editing.highlight_words = textadept.editing.HIGHLIGHT_CURRENT
-- Highlight all occurrences of the selected word.
textadept.editing.highlight_words = textadept.editing.HIGHLIGHT_SELECTED

Textadept does not perform any automatic highlighting by default.
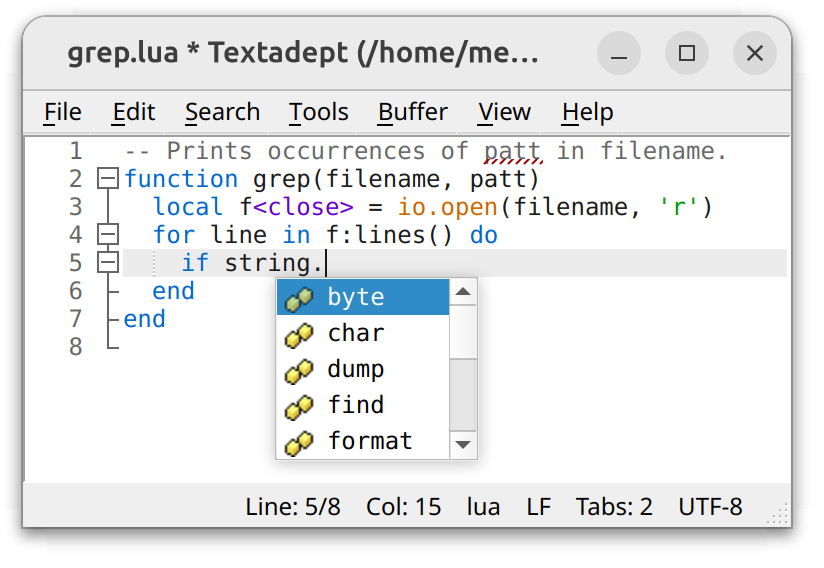
Autocompletion
Textadept autocompletes words in the current buffer via Ctrl+Enter on Windows and
Linux/BSD, ⌘↩ on macOS, and ^Enter in the terminal version. If there are multiple
candidates, the editor shows a list of suggestions. Continuing to type may change the
suggestion. Use the arrow keys to navigate within the list and press Enter to finish
the completion. You can expand the word pool to include all open buffers by setting
textadept.editing.autocomplete_all_words. For example, in ~/.textadept/init.lua:
textadept.editing.autocomplete_all_words = true
Tip: the external Language Server Protocol module provides language-specific autocompletions. It also shows symbol documentation. These features enable you to easily configure and extend Textadept, as well as understand its API, all from within the editor itself.
Text Selections
Textadept has three kinds of text selections: contiguous, multiple, and rectangular.
You can create contiguous selections as follows:
- Make an arbitrary selection anchored at the caret by pressing the arrow keys, home/end, page
up/down, etc. while holding down the
Shiftkey, or by simply clicking and dragging the mouse. - Make an arbitrary selection in the terminal version by entering selection mode via
^^and using normal movement keys. This is for terminals that do not recognizeShiftwith movement keys. While in selection mode, swap the start and end positions via^]in order to alter the selection from its opposite side. Exit selection mode by typing text, deleting text, performing an action that changes text, or by pressing^^again. - Select the current word via
Ctrl+Don Windows and Linux/BSD,⌘Don macOS, and^Din the terminal version. Repeated use of this action selects subsequent occurrences of that word as additional (multiple) selections. Undo the most recent multiple selection viaCtrl+Alt+D,^⌘D, orM-D. - Select the current line via
Ctrl+Shift+Lon Windows and Linux/BSD,⌘⇧Lon macOS, andM-^Lin the terminal version. If text is already selected and spans multiple lines, this action expands the selection to include whole lines. - Double click to select a word, and triple-click to select a line.
- Click and optionally drag within the line number margin to select whole lines.
- Select the current paragraph via
Ctrl+Shift+Pon Windows and Linux/BSD,⌘⇧Pon macOS, andM-^Pin the terminal version. Paragraphs are surrounded by one or more blank lines. - Select all buffer text via
Ctrl+Aon Windows and Linux/BSD,⌘Aon macOS, and^Ain the terminal version. - Select text between matching delimiters (parentheses, brackets, braces, single quotes,
double-quotes, back quotes, and HTML/XML tag characters) via
Ctrl+Shift+Mon Windows and Linux/BSD,⌘⇧Mon macOS, andM-^Min the terminal version. Repeated use of this action toggles the selection of the delimiters themselves. - Undo a selection via
Ctrl+Shift+Aon Windows and Linux/BSD,⌘⇧Aon macOS, andM-^Ain the terminal version. (This is useful in case you accidentally pressCtrl+A,⌘A, or^A.) - When using the mouse in the terminal version in the Windows command prompt, Shift+Double-click extends the selection to the clicked point, and quadruple-click within a selection collapses it.
You can create multiple selections as follows:
- Add another selection by holding down
Ctrl, clicking, and optionally dragging the mouse over a range of text. - Select as an additional selection the next occurrence of the current word via
Ctrl+Don Windows and Linux/BSD,⌘Don macOS, and^Din the terminal version.
Textadept mirrors any typed or pasted text at each selection. Deselect a particular additional
selection by holding down Ctrl and clicking it with the mouse.
You can create a rectangular selection as follows:
- Press the arrow keys, home/end, or page up/down, while holding down
Alt+Shifton Windows and Linux/BSD,^⇧on macOS, andM-S-in the terminal version. - Click and drag the mouse while holding down the
Altkey on Windows and Linux/BSD, and⌥on macOS. - Click and drag the mouse without holding down any modifiers (thus making a normal, multi-line
selection), press and hold down the
Altkey on Windows and Linux/BSD,⌥on macOS, andM-in the terminal version, and then continue dragging the mouse. This works around the Linux/BSD window managers that consumeAlt+Shift+ arrow keys andAlt+ mouse drag.
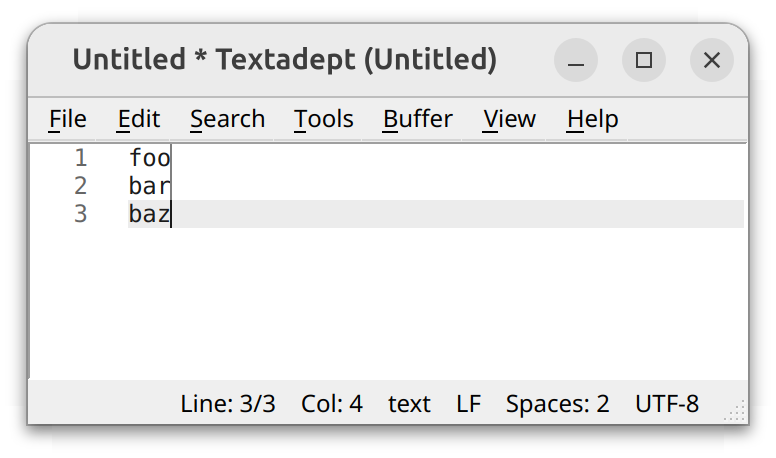
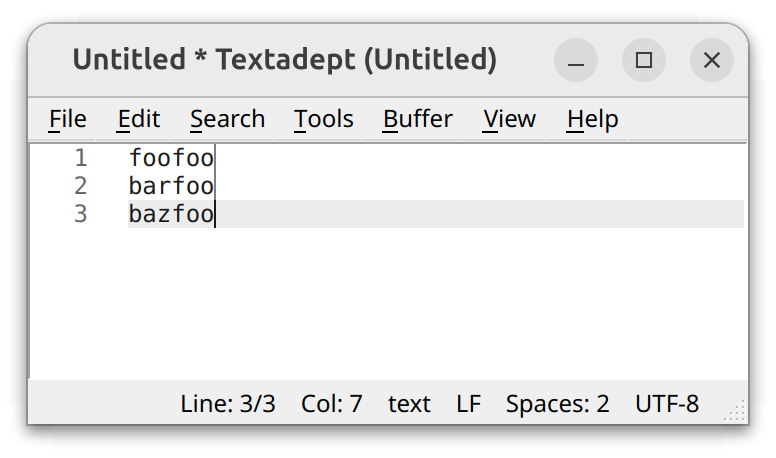
Textadept allows a zero-width rectangular selection that spans multiple lines, and mirrors any typed or pasted text on all of those lines.
You can also copy rectangular blocks of text and paste them into rectangular blocks of the same size.
Note: macOS does not support directly pasting into rectangular selections. Instead, use
the Lua Command Entry and enter replace_rectangular(clipboard_text)
after copying a block of text.
Text Transformations
Textadept can apply many different transformations to the current word, line, and selected text:
- Enclose the current word or selected text within delimiters like parentheses, braces, brackets, single quotes, double quotes, or HTML/XML tags using the key bindings listed in the “Edit > Selection” submenu.
- Convert the selected text or current word to upper or lower case via
Ctrl+Shift+UorCtrl+U, respectively, on Windows and Linux/BSD;⌘Uor⌘⇧U, respectively, on macOS; andM-^UorM-Uin the terminal version. - Increase or decrease the indentation of the selected lines via
TaborShift+Tab, respectively, on Windows and Linux/BSD;⇥or⇧⇥, respectively on macOS; andTaborS-Tabin the terminal version. You do not have to select whole lines; selecting any part of a line is sufficient. - Move the current or selected line(s) up or down via
Ctrl+Alt+Shift+UporCtrl+Alt+Shift+Down, respectively, on Windows and Linux/BSD; and^⌘⇧⇡or^⌘⇧⇣, respectively, on macOS. You do not have to select whole lines; selecting any part of a line is sufficient. - Comment out code on the current or selected line(s) via
Ctrl+/on Windows and Linux/BSD,⌘/on macOS, and^?orM-/in the terminal version. You do not have to select whole lines; selecting any part of a line is sufficient. -
Enclose selected text between any typed punctuation character (taking into account
textadept.editing.auto_pairs) after settingtextadept.editing.auto_enclose. For example, in your ~/.textadept/init.lua:textadept.editing.auto_enclose = true
Navigate Through History
Textadept records buffer positions within views over time and allows for navigating through
that history. Navigate backward or forward via Ctrl+[ or Ctrl+], respectively, on Windows
and Linux/BSD; ⌘[ or ⌘], respectively, on macOS; and M-[ or M-], respectively, in the
terminal version.
Go To Line
Jump to a specific line in the current buffer via Ctrl+L on Windows and Linux/BSD, ⌘L
on macOS, and ^L in the terminal version. Enter the line number to go to in the prompt,
and press Enter or click OK.
Bookmarks
Textadept allows you to bookmark lines and jump back to them later:
- Toggle a bookmark on the current line via
Ctrl+Kon Windows and Linux/BSD,⌘Kon macOS, and^Kin the terminal version. - Go to the next bookmarked line via
Ctrl+Alt+Kon Windows and Linux/BSD,^⌘Kon macOS, andM-Kin the terminal version. - Go to the previously bookmarked line via
Ctrl+Alt+Shift+Kon Windows and Linux/BSD,^⌘⇧Kon macOS, andM-S-Kin the terminal version. - Go to the bookmarked line selected from a list via
Ctrl+Shift+Kon Windows and Linux/BSD,⌘⇧Kon macOS, andM-^Kin the terminal version. - Clear all bookmarks in the current buffer using the “Tools > Bookmarks > Clear Bookmarks” menu item.
The editor displays bookmarks in the left-hand margin after line numbers.
Macros
Macros enable you to record a series of edits and play them back without having to write a custom Lua script:
- Start and stop recording a macro via
Alt+,on Windows and Linux/BSD,^,on macOS, andM-,in the terminal version. The status bar displays when a macro starts and stops recording. - Play back the most recently recorded or loaded macro via
Alt+.on Windows and Linux/BSD,^.on macOS, andM-.in the terminal version. - Register the most recently recorded macro to alphanumeric character char via
Ctrl+Alt+Shift+Rchar on Windows and Linux/BSD,^⌘⇧Rchar on macOS, andM-S-Rchar in the terminal version. Note that this is a two-sequence key chain. - Optionally save the most recently recorded macro to a file using the “Tools > Macros > Save…” menu item.
- Load and play a macro registered to alphanumeric character char via
Ctrl+Alt+Rchar on Windows and Linux/BSD,^⌘Rchar on macOS, andM-Rchar in the terminal version. Note that this is a two-sequence key chain. You can now replay this loaded macro via the default macro play key binding. - Load a saved macro from a file using the “Tools > Macros > Load…” menu item. Play the loaded macro via the default macro play key binding.
Tip: the previously recorded/loaded macro is always registered to 0 (zero), so if you
accidentally recorded/loaded a macro without having registered/saved the previous one, you can
reload and play it via Ctrl+Alt+R 0 on Windows and Linux/BSD, ^⌘R 0 on macOS, and M-R 0
in the terminal version.
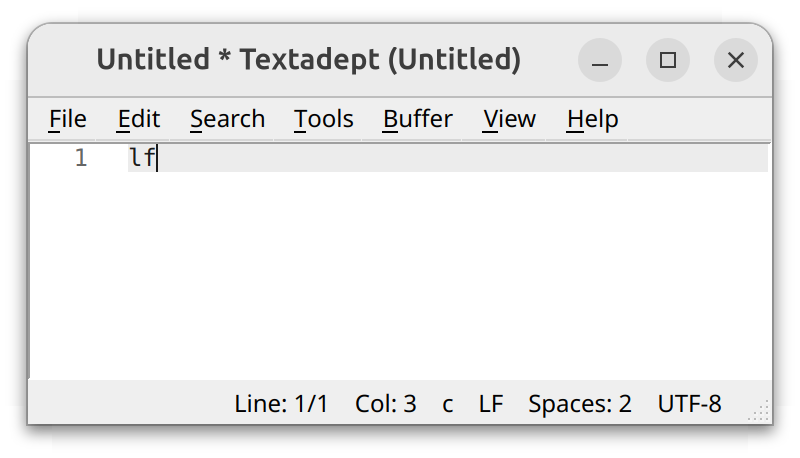
Snippets
Snippets are dynamic text templates for quickly inserting code constructs. They may contain plain text, placeholders for interactive input, mirrors and transforms for interactive input, and arbitrary Shell code.
A snippet has a trigger word associated with template text in the snippets table. The
snippets documentation describes snippet syntax. Language-specific snippets are in a subtable
assigned to their language’s lexer name. Snippets may also be the contents of files in a snippet
directory, with file names being trigger words.
- Insert a snippet from a list of available snippets using the “Tools > Snippets > Insert
Snippet…” menu item. Typing part of a snippet trigger in the dialog filters the list, with
spaces being wildcards. The arrow keys move the selection up and down. Pressing
Enter, selectingOK, or double-clicking on a snippet inserts it into the current buffer. (The terminal version requires pressingEnter.) - Autocomplete a snippet trigger word using the “Tools > Snippets > Complete Trigger Word” menu
item. If there are multiple candidates, the editor shows a list of suggestions. Continuing
to type may change the suggestion. Use the arrow keys to navigate within the list and press
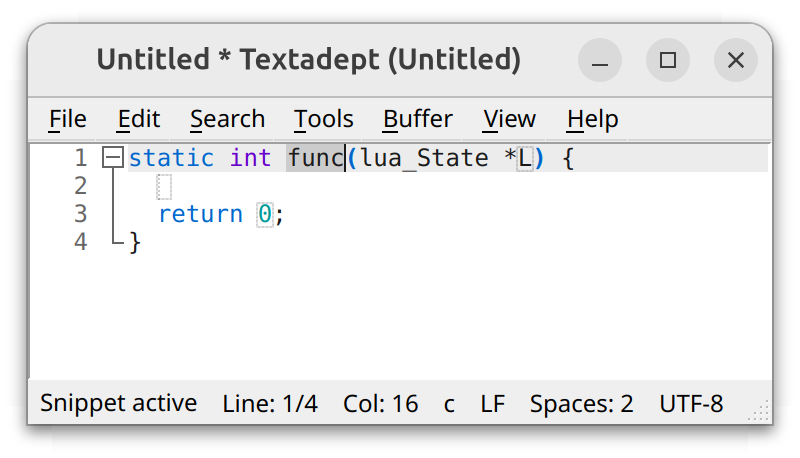
Enterto finish the completion. - Insert a snippet based on the trigger word behind the caret via
Tabon Windows, Linux, BSD, and in the terminal version; and⇥on macOS. You can insert another snippet within an active snippet. A previously active snippet will pick up where it left off after a nested snippet finishes. - Navigate to the next placeholder in the current snippet via
Tabon Windows, Linux, BSD, and in the terminal version; and⇥on macOS. - Navigate to the previous placeholder in the current snippet via
Shift+Tabon Windows and Linux/BSD,⇧⇥on macOS, andS-Tabin the terminal version. If there is no previous placeholder, this action cancels the current snippet. - Cancel the current snippet via
Esc.
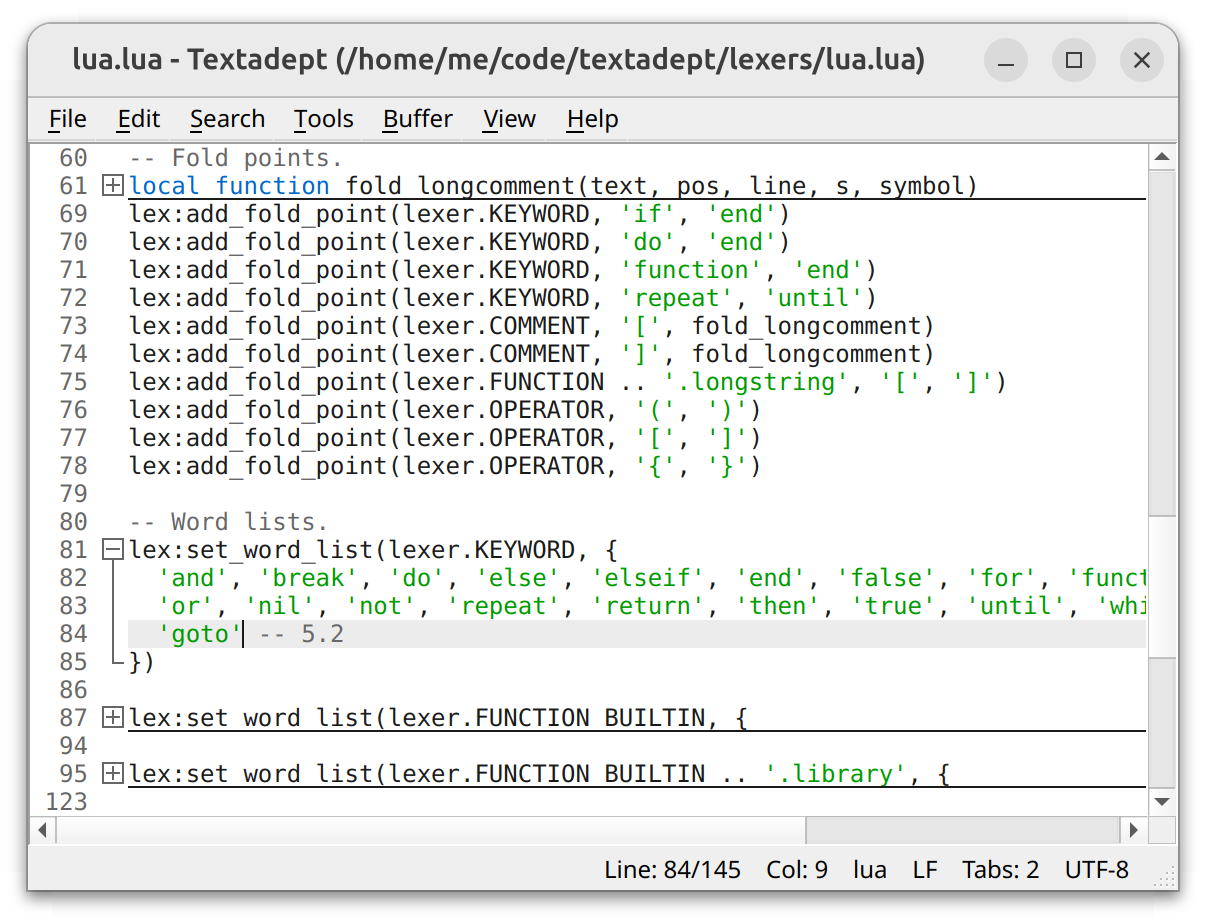
Code Folding
Many of Textadept’s lexers can identify blocks of code and mark their fold points in the editor’s left-hand margin.
- Toggle the visibility of a code block by clicking on its marker, or toggle the visibility
of the current block via
Ctrl+)on Windows and Linux/BSD,⌘)on macOS, andM-)in the terminal version. - Use the “View > Code Folding” submenu to manipulate folds.
- Turn off/on code folding for a buffer using the “Buffer > Toggle Code Folding” menu item.
Tip: you can turn off code folding completely by changing buffer.folding. For example
in your ~/.textadept/init.lua:
buffer.folding = false
Virtual Space
Textadept normally constrains the caret within the content of text lines. Enabling virtual space allows you to move the caret into the space beyond the ends of lines. Toggle virtual space using the “View > Toggle Virtual Space” menu item.
Key Bindings
Key bindings are key sequences assigned to commands (Lua functions) in the keys table. A
key sequence is an ordered combination of modifier keys followed by either the key’s inserted
character or, if no such character exists, the string representation of the key according to
keys.KEYSYMS. Language-specific keys are in a subtable assigned to their language’s lexer
name. You can assign key sequences to tables of key bindings to create key chains (e.g. Emacs
C-x prefix). You can also group key bindings into modes such that while a mode is active,
Textadept ignores all key bindings outside that mode until the mode is unset (e.g. Vim-style
modal editing). The keys documentation describes all of this in more detail.
Tip: you can query a key binding’s sequence and see if it has an assigned command via
Ctrl+Shift+H on Windows and Linux/BSD, ⌘⇧H on macOS, and M-S-H in the terminal
version. While this mode is active, the statusbar shows typed key sequences and their assigned
commands, if any. Textadept also copies the sequence to the clipboard. Pressing Esc deactivates
the mode.
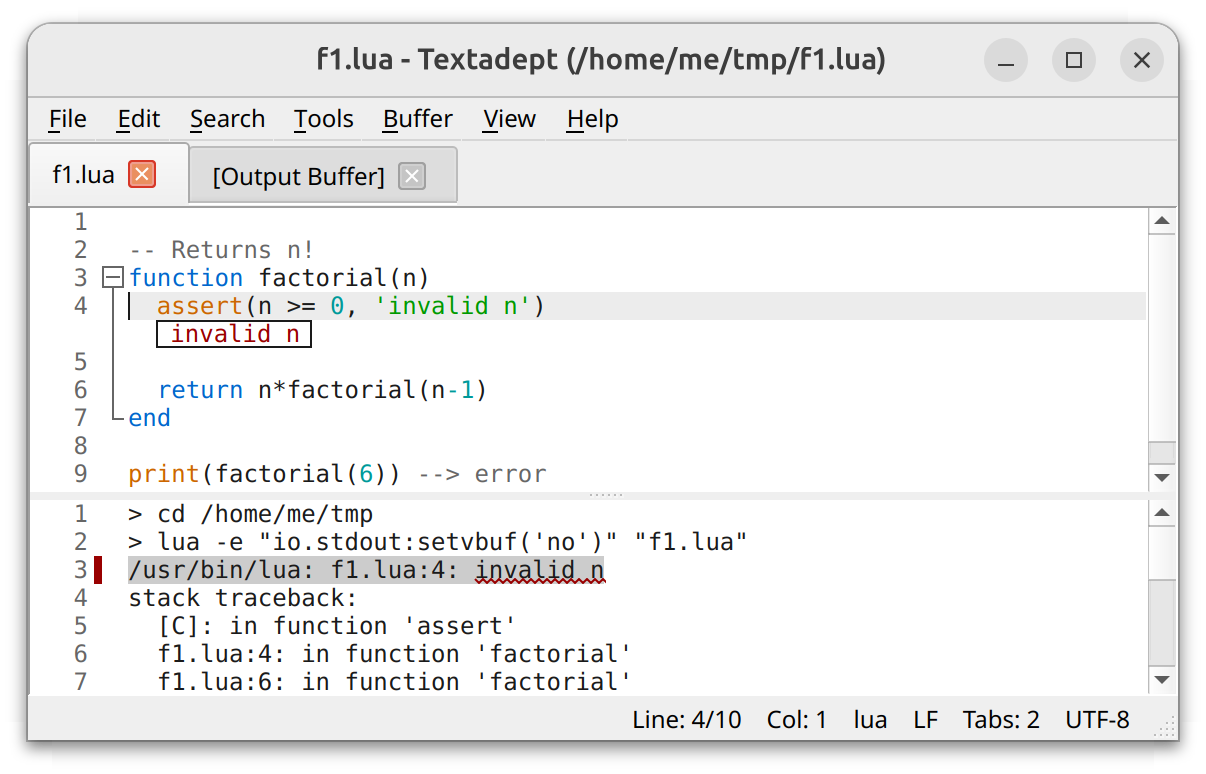
Compile, Run, Build, and Test
Textadept knows most of the commands that compile and/or run code in source files. It also knows some of the commands that build projects, and you can tell the editor how to run your project’s test suite. Finally, Textadept allows you to run arbitrary commands in the context of your project. The editor prints command output in real-time to a temporary buffer and marks any warning and error messages it recognizes.
- Compile the current file via
Ctrl+Shift+Con Windows and Linux/BSD,⌘⇧Con macOS, andM-^Cin the terminal version. - Run the current file via
Ctrl+Ron Windows and Linux/BSD,⌘Ron macOS, and^Rin the terminal version. - Build the current project via
Ctrl+Shift+Bon Windows and Linux/BSD,⌘⇧Bon macOS, andM-^Bin the terminal version. - Run tests for the current project via
Ctrl+Shift+Ton Windows and Linux/BSD,⌘⇧Ton macOS, andM-^Tin the terminal version. - Run a command for the current project via
Ctrl+Shift+Ron Windows and Linux/BSD,⌘⇧Ron macOS, andM-^Rin the terminal version. - Stop the currently running compile, run, build, or test command’s process via
Ctrl+Shift+Xon Windows and Linux/BSD,⌘⇧Xon macOS, andM-^Xin the terminal version. - Jump to the source of the next recognized warning or error via
Ctrl+Alt+Eon Windows and Linux/BSD,^⌘Eon macOS, andM-Ein the terminal version. - Jump to the source of the previously recognized warning or error via
Ctrl+Alt+Shift+Eon Windows and Linux/BSD,^⌘⇧Eon macOS, andM-S-Ein the terminal version. - Jump to the source of the recognized warning or error on the current line via
Enter, or by double-clicking on that line.
Prior to running a compile, run, build, or test command, Textadept prompts you with either:
- A command it thinks is appropriate for the current file or project.
- A command you have specified for the current context (e.g. via ~/.textadept/init.lua).
- A command you have previously run in the current context.
- A blank command for you to fill in.
Make any necessary changes to the command and then run it by pressing Enter. Cycle through
command history via Up and Down on Windows, Linux, BSD, and the terminal version; and ⇡
and ⇣ on macOS. Cancel the prompt via Esc. Textadept remembers compile and run commands on
a per-filename basis, and it remembers build, test, and project commands on a per-directory basis.
You can configure Textadept to run commands immediately without a prompt by setting
textadept.run.run_without_prompt. You can also have the editor print command output in
the background by changing textadept.run.run_in_background. For example, in your ~/.textadept/init.lua:
textadept.run.run_without_prompt = true
textadept.run.run_in_background = true
You can change or add compile, run, build, test, and project commands by modifying
the textadept.run.compile_commands, textadept.run.run_commands,
textadept.run.build_commands, textadept.run.test_commands, and
textadept.run.run_project_commands tables, respectively. For example, in your
~/.textadept/init.lua:
textadept.run.compile_commands.foo = 'foo "%f"'
textadept.run.run_commands.foo = './"%e"'

textadept.run.build_commands['/path/to/project'] = 'make -C src -j4'
textadept.run.test_commands['/path/to/project'] = 'lua tests.lua'
textadept.run.run_project_commands['/path/to/project'] = function() ... end
Tip: you can set compile and run commands on a per-filename basis.
macOS Tip: GUI applications like Textadept.app run in a restricted environment with a
stripped-down $PATH. (The terminal version is unaffected.) Thus, Textadept may fail to find
compile/run programs outside that $PATH (e.g. programs installed with Homebrew). The editor
attempts to work around this by silently invoking your $SHELL and extracting its environment
(including its full $PATH), but if this fails, you will need to supply absolute paths to
executables.
Modules
Modules are packages of Lua code that provide functionality for Textadept. Most of the editor’s features come from individual modules (Textadept’s core/ and modules/ directories). Textadept can load modules when the application starts up, and it can load modules on-demand in response to events. Once a module is loaded, it persists in memory and is never unloaded.
Textadept attempts to load a given module from the following locations:
- Your ~/.textadept/modules/ directory.
- Textadept’s modules/ directory.
Tip: placing modules in your user data directory avoids the possibility of you overwriting them when you update Textadept.
Just because a module exists does not mean Textadept will automatically load it. The editor only loads modules it is explicitly told to load (e.g. from your ~/.textadept/init.lua). For example, in your ~/.textadept/init.lua:
local lsp = require('lsp')
lsp.server_commands.cpp = 'clangd'
If you have a module for a particular programming language, you can automatically load it when opening a file of that type:
events.connect(events.LEXER_LOADED, function(name)
	if package.searchpath(name, package.path) then require(name) end
end)
Note: lexer language names are typically the names of lexer files in your ~/.textadept/lexers/ directory and Textadept’s lexers/ directory.
Developing Modules
Modules follow the Lua package model: a module is either a single Lua file or a group of Lua files in a directory that contains an init.lua file (which is the module’s entry point). The name of the module is its file name or directory name, respectively. Here are some basic guidelines for developing modules, and some things to keep in mind:
- Modules should return a table of functions and fields that are defined locally, rather than
globally. (This is standard Lua practice.) That way, the construct
local foo = require('foo')behaves as expected. - Modules should not define global variables, as all modules share the same Lua state.
- Modules should only be named after lexer languages if they provide language-specific functionality.
- Modules must not call any functions that create buffers and views (e.g.
ui.print(),io.open_file(), andbuffer.new()) at file-level scope. Buffers and views can only be created within functions assigned to keys, associated with menu items, or connected to events.
Themes
Themes customize the editor’s look and feel. Textadept comes with three built-in themes: “light”, “dark”, and “term”. The default theme for the GUI version is “light” if light mode is currently enabled, or “dark” if dark mode is enabled. The default theme for the terminal version is “term”.
A theme consists of a single Lua file, and defines the colors and text display settings (styles) used in syntax highlighting. It also assigns colors to various UI elements like carets, selections, margins, markers, highlights, errors, and warnings.
Note: Textadept cannot theme its own GUI widgets. You must use the theming tools provided by the applicable Qt or GTK widget toolkit.
Textadept attempts to load themes from the following locations:
- Your ~/.textadept/themes/ directory.
- Textadept’s themes/ directory.
Tip: placing themes in your user data directory avoids the possibility of you overwriting them when you update Textadept.
You can set Textadept’s theme using view:set_theme(). You can also tweak a theme’s styles
on a per-language basis. For example, in your ~/.textadept/init.lua:
if UI ~= 'terminal' then
	view:set_theme('light', {font = 'Monospace', size = 12})
	-- You can alternatively use the following to keep the default theme:
	-- view:set_theme{font = 'Monospace', size = 12}
end

-- Color Java class names black instead of the default yellow.
events.connect(events.LEXER_LOADED, function(name)
	if name ~= 'java' then return end
	local default_fore = view.style_fore[view.STYLE_DEFAULT]
	view.style_fore[buffer:style_of_name(lexer.CLASS)] = default_fore
end)
Tip: you can experiment with themes without having to restart Textadept by using the
reset() command in the Lua Command Entry. After making changes
to either your ~/.textadept/init.lua or theme file, issue the reset command to reload
your changes.
Scripting
Nearly every aspect of Textadept can be scripted, extended, and customized with Lua. In fact, most of the editor’s features are implemented in Lua: syntax highlighting, opening and saving files, and search and replace, to name a few. Textadept contains its own internal copy of Lua 5.4.
Being an event-driven application, Textadept simply responds to input like key presses,
mouse clicks, and state changes by running Lua code (more specifically, executing Lua
functions). For example, when you press a key, Textadept emits an events.KEYPRESS event,
which its core/keys.lua is listening for. When the editor recognizes a key sequence like
Ctrl+O on Windows and Linux/BSD, core/keys.lua looks up which Lua function is assigned
to the keys['ctrl+o'] key. By default, it is io.open_file(), so Textadept executes that
function, which prompts the user for a file to open. You could bind a different function to
that key and the editor will duly execute it instead. Similarly, when Textadept opens a file via
io.open_file(), that function emits a events.FILE_OPENED event, which you could listen for in
your ~/.textadept/init.lua and perform your own action, such as loading some project-specific
tools for editing that file.
Your ~/.textadept/init.lua is the entry point to scripting Textadept. In this file you can set up custom key bindings, menu items, and event handlers that will perform custom actions. Here are some ideas:
- Define custom key bindings and menu items that manipulate
buffercontents. - Extend Textadept’s File menu with a menu item that prompts for a commit message using an interactive dialog, and then invokes a project command that commits the current file to version control using the provided message.
- Listen for the
events.FILE_SAVEDevent and spawn an asynchronous process that runs a syntax checker, linter, or formatter on a source file when it is saved. - Start searches with the word under the caret by substituting the “Search > Find” menu item
and key binding functions with a custom function that pre-populates
ui.find.find_entry_textbefore callingui.find.focus()to show the find & replace pane. - Auto-save files as you switch between buffers by listening for the
events.BUFFER_BEFORE_SWITCHevent and callingbuffer:save()for buffers that have abuffer.filename. You can even auto-save on a timer viatimeout(). - Overload Textadept’s find & replace capabilities to use Lua patterns instead of regex by
reacting to
events.FINDandevents.REPLACEbefore Textadept can, and then determining whether or not the editor’s default routines should handle those events. - Register your own command line argument using
args.register()to add a “read-only” mode. - Add a custom command to the default right-click context menu by appending to
textadept.menu.context_menu.
Textadept’s Lua API is extensively documented and serves as the ultimate resource when it comes to scripting the editor.
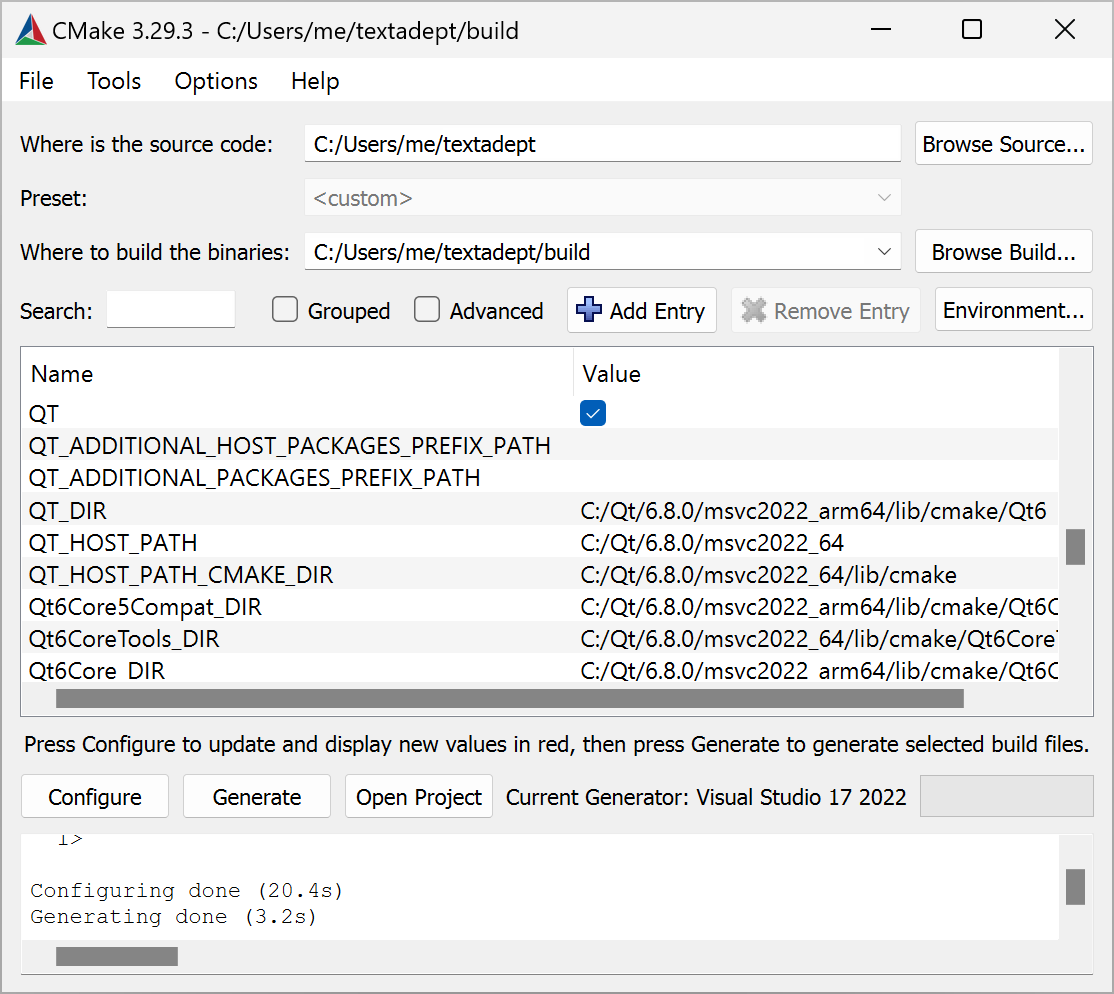
Compiling
Textadept uses CMake to build on Windows, macOS, Linux, and BSD. CMake automatically detects which UI toolkits are available and builds for them. On Windows and macOS you can then use CMake to create a self-contained application to run from anywhere. On Linux and BSD you can either use CMake to install Textadept, or place compiled binaries into Textadept’s root directory and run it from there.
Requirements
Textadept requires the following:
- CMake 3.22+
- A C and C++ compiler, such as:
- GNU C compiler (gcc) 7.1+
- Microsoft Visual Studio 2019+
- Clang 13+
- A UI toolkit (at least one of the following):
- Unix
patchcommand
Windows Note: Git for Windows includes a patch command.
macOS Note: XCode provides Clang.
Linux Note: a package manager likely supplies these requirements. On Ubuntu for example,
the build-essential, qtbase5-dev, libgtk-3-dev (or libgtk2.0-dev), and libncurses-dev
packages are all that is needed.
Compiling
Basic procedure:
- Configure CMake by pointing it to Textadept’s source directory (where CMakeLists.txt is),
specify a directory to build in, and optionally specify a directory to install to. CMake will
determine what UI toolkits are available and fetch third-party build dependencies.
- Build Textadept.
- Either copy the built binaries to Textadept’s source directory or use CMake to install it.
For example:
cmake -S . -B build_dir -D CMAKE_BUILD_TYPE=RelWithDebInfo \
	-D CMAKE_INSTALL_PREFIX=build_dir/install
cmake --build build_dir -j # compiled binaries are in build_dir/
cmake --install build_dir # self-contained installation is in build_dir/install/
Windows Note: you need to run these commands from Visual Studio’s developer command prompt if you are not using CMake’s GUI and Visual Studio.
Tip: you can use the environment variable TEXTADEPT_HOME to specify the location of
Textadept’s root directory. Doing so allows you to run Textadept executables directly from the
binary directory without having to install or copy them.
Windows and macOS Note: when creating the self-contained Qt version of Textadept, Qt’s
bin/ directory should be in your %PATH% or $PATH, respectively.
CMake boolean variables that affect the build:
NIGHTLY: Whether or not to build Textadept with bleeding-edge dependencies (i.e. the nightly version). Defaults to off.QT: Unless off, builds the Qt version of Textadept. The default is auto-detected.GTK3: Unless off, builds the Gtk 3 version of Textadept. The default is auto-detected.GTK2: Unless off, builds the Gtk 2 version of Textadept. The default is auto-detected.CURSES: Unless off, builds the Curses (terminal) version of Textadept. The default is auto-detected.GENERATE_HTML: When on, creates ahtmltarget to build HTML documentation in the docs/ directory (e.g.cmake --build build_dir --target html). Requires Lua and Ruby to be installed. Defaults to off.TEXTADEPT_HOME: When set on Linux or BSD, uses the given location as Textadept’s root directory. Setting this is probably only useful for distribution managers that want to install binaries separately from data files.
Appendix
Regex and Lua Pattern Syntax
The following table outlines Regex and Lua Pattern syntax:
| Regex | Lua | Meaning |
|---|---|---|
| . | . | Matches any character |
| [[:alpha:]] | %a | Matches any letter |
| \d | %d | Matches any digit |
| [[:lower:]] | %l | Matches any lower case character |
| [[:punct:]] | %p | Matches any punctuation character |
| \s | %s | Matches any space character |
| [[:upper:]] | %u | Matches any upper case character |
| \w | %w | Matches any alphanumeric character (Regex includes ‘_’) |
| [[:xdigit:]] | %x | Matches any hexadecimal digit |
| [set] | [set] | Matches any character in set, including ranges like A-Z |
| [^set] | [^set] | Matches the complement of set |
| * | * | Matches the previous item (Regex) or class (Lua) 0+ times |
| + | + | Matches the previous item or class 1+ times |
| *? | - | Matches the previous item or class 0+ times, non-greedily |
| +? | Matches the previous item 1+ times, non-greedily | |
| ? | ? | Matches the previous item or class once or not at all |
| {m,n} | Matches the previous item between m and n times | |
| {m,} | Matches the previous item at least m times | |
| {m} | Matches the previous item exactly m times | |
| | | Matches either the previous item or the next item | |
| %bxy | Matches a balanced string bounded by x and y | |
| %f[set] | Matches a position between characters not in and in set | |
| \< | Matches the beginning of a word | |
| \> | Matches the end of a word | |
| \b | Matches a word boundary | |
| ^ | ^ | Matches the beginning of a line unless inside a set |
| $ | $ | Matches the end of a line unless inside a set |
| ( | ( | The beginning of a captured matching region |
| ) | ) | The end of a captured matching region |
| (?:…) | Consider matched “…” as a single, uncaptured item | |
| \n | %n | The nth captured matching region’s texta |
| \x | %x | Non-alphanumeric character x, ignoring special meaning |
aIn replacement text, “\0” (Regex) or “%0” (Lua) represents all matched text.
Textadept’s regular expressions are based on the C++11 standard for ECMAScript. There are a number of references for this syntax on the internet, including:
- ECMAScript syntax C++ reference
- Modified ECMAScript regular expression grammar
- Regular Expressions (C++)
More information on Lua patterns can be found in the Lua 5.4 Reference Manual.
Terminal Version Compatibility
Textadept’s terminal version requires a font with good glyph support (like DejaVu Sans Mono or Liberation Mono), and lacks some GUI features due to the terminal’s constraints:
- No alpha values or transparency.
- No images in autocompletion lists. Instead, autocompletion lists show the first character in
the string passed to
buffer:register_image(). - No buffered or two-phase drawing.
- Carets cannot have a period, line style, or width.
- No drag and drop.
- Edge lines may be obscured by text.
- No extra line ascent or descent.
- No fold lines above and below lines.
- Fold marker highlighting can only be bold, not colored.
- No hotspot underlines on mouse hover.
- No indicators other than
INDIC_ROUNDBOXandINDIC_STRAIGHTBOX, although neither has translucent drawing andINDIC_ROUNDBOXdoes not have rounded corners. - Indent guide highlighting can only be in white, not the brace highlight color.
- Some complex marker symbols are not drawn properly or at all.
- No mouse cursor types.
- Not all key sequences are recognized properly, such as
Shift+Arrowfor making selections. - No style settings like font name, font size, or italics.
- No zoom.
Directory Structure
Textadept’s directory structure is organized as follows:
- core/: Contains Textadept’s core Lua modules. These modules are essential for the application to run, providing Textadept’s Lua to C interface, event framework, file and lexer interactions, and localization.
- lexers/: Houses the lexer modules that analyze source code for syntax highlighting.
- modules/: Contains modules for editing text and source code.
- themes/: Contains built-in themes that customize the look and feel of Textadept.
- iconengines/, imageformats/, platforms/, styles/, and translations/: Qt support directories that appear only in the Windows package.
Technologies
Textadept is composed of the following technologies:
- Qt: cross-platform GUI toolkit
- GTK: cross-platform GUI toolkit
- ncurses: terminal UI library for macOS, Linux, and BSD
- pdcurses: terminal UI library for Windows
- cdk: terminal UI widget toolkit
- libtermkey: terminal keyboard entry handling library
- Scintilla: core text editing component
- Scinterm: curses (terminal) platform for Scintilla
- Scintillua: syntax highlighting for Scintilla using Lua lexers
- Lua: core scripting language
- LPeg: Lua pattern matching library for syntax highlighting
- LuaFileSystem: Lua library for accessing the host filesystem
- Lua-std-regex: Lua library for regular expressions
- iconv: library for converting text to and from Unicode
- QtSingleApplication: single-instance application support for Qt
- reproc: process spawning library for the terminal version
Migrating from Textadept 12 to 13
API Changes
| Old API | Change | New API |
|---|---|---|
| _G | ||
| WIN32 | Replaced | OS == ‘windows’ a |
| OSX | Replaced | OS == ‘macos’ a |
| Linux | Replaced | OS == ‘linux’ a |
| BSD | Replaced | OS == ‘bsd’ a |
| QT | Replaced | UI == ‘qt’ a |
| GTK | Replaced | UI == ‘gtk’ a |
| CURSES | Replaced | UI == ‘terminal’ a |
| ui | ||
| get_split_table() | Changed | size field is now a {width, height, split pos} table |
| view | ||
| size | Renamed | split_pos |
| parent_size | Renamed | parent_split_pos |
aIf you want to keep using the booleans, put the following at the top of your ~/.textadept/init.lua:
for k, v in pairs{windows='WIN32',macos='OSX',linux='LINUX',bsd='BSD',qt='QT',gtk='GTK',terminal='CURSES'} do _G[v] = OS == k or UI == k end
Key Binding Changes
- Go to Line has changed from
Ctrl+Gon Windows and Linux/BSD,⌘Gon macOS, and^Gin the terminal version, toCtrl+L,⌘L, and^L, respectively. - Select Line has changed from
Ctrl+Lon Windows and Linux/BSD,⌘Lon macOS, and^Lin the terminal version, toCtrl+Shift+L,⌘⇧L, andM-^L, respectively. - Select Lexer has changed from
Ctrl+Shift+Lon Windows and Linux/BSD,⌘⇧Lon macOS, andM-^Lin the terminal version, toCtrl+Alt+L,^⌘L, andM-L, respectively.
Lua 5.5 Changes
Textadept 13 uses Lua 5.5, which has some incompatibilities compared to Textadept 12’s Lua 5.4:
- The word
globalis a reserved word. Do not use it as a regular name. - The control variable in for loops is read only. If you need to change it, declare a local variable with the same name in the loop body.
- A chain of
__callmetamethods can have at most 15 objects. - In an error, a
nilas the error object is replaced by a string message.
You may need to update your ~/.textadept/init.lua or any custom modules, particularly if your loops modify control variables.
See this page for more details on incompatibilities between Lua 5.4 and 5.5.